
Easy 'Let It Be' tutorial for beginners
‘Let It Be’ by The Beatles is a classic for a reason. It’s an incredible song with an easy chord progression and a recognisable bass riff. In this lesson, we’ll talk about some of the key things beginner guitar players will want to keep in mind when learning this song, some useful techniques to practice, and some cool tricks you can use to level up your strumming patterns and play like a pro.
Let’s start by getting our heads around the timing.
The chords in ‘Let It Be’ change every two beats. Before we go any further, make sure you’re comfortable with these changes. You can either practice them with one down strum per chord (each strum lasting two beats), or one strum on each beat (two strums per chord).
If needed, you can find the chord shapes for this progression at the end of the lesson.
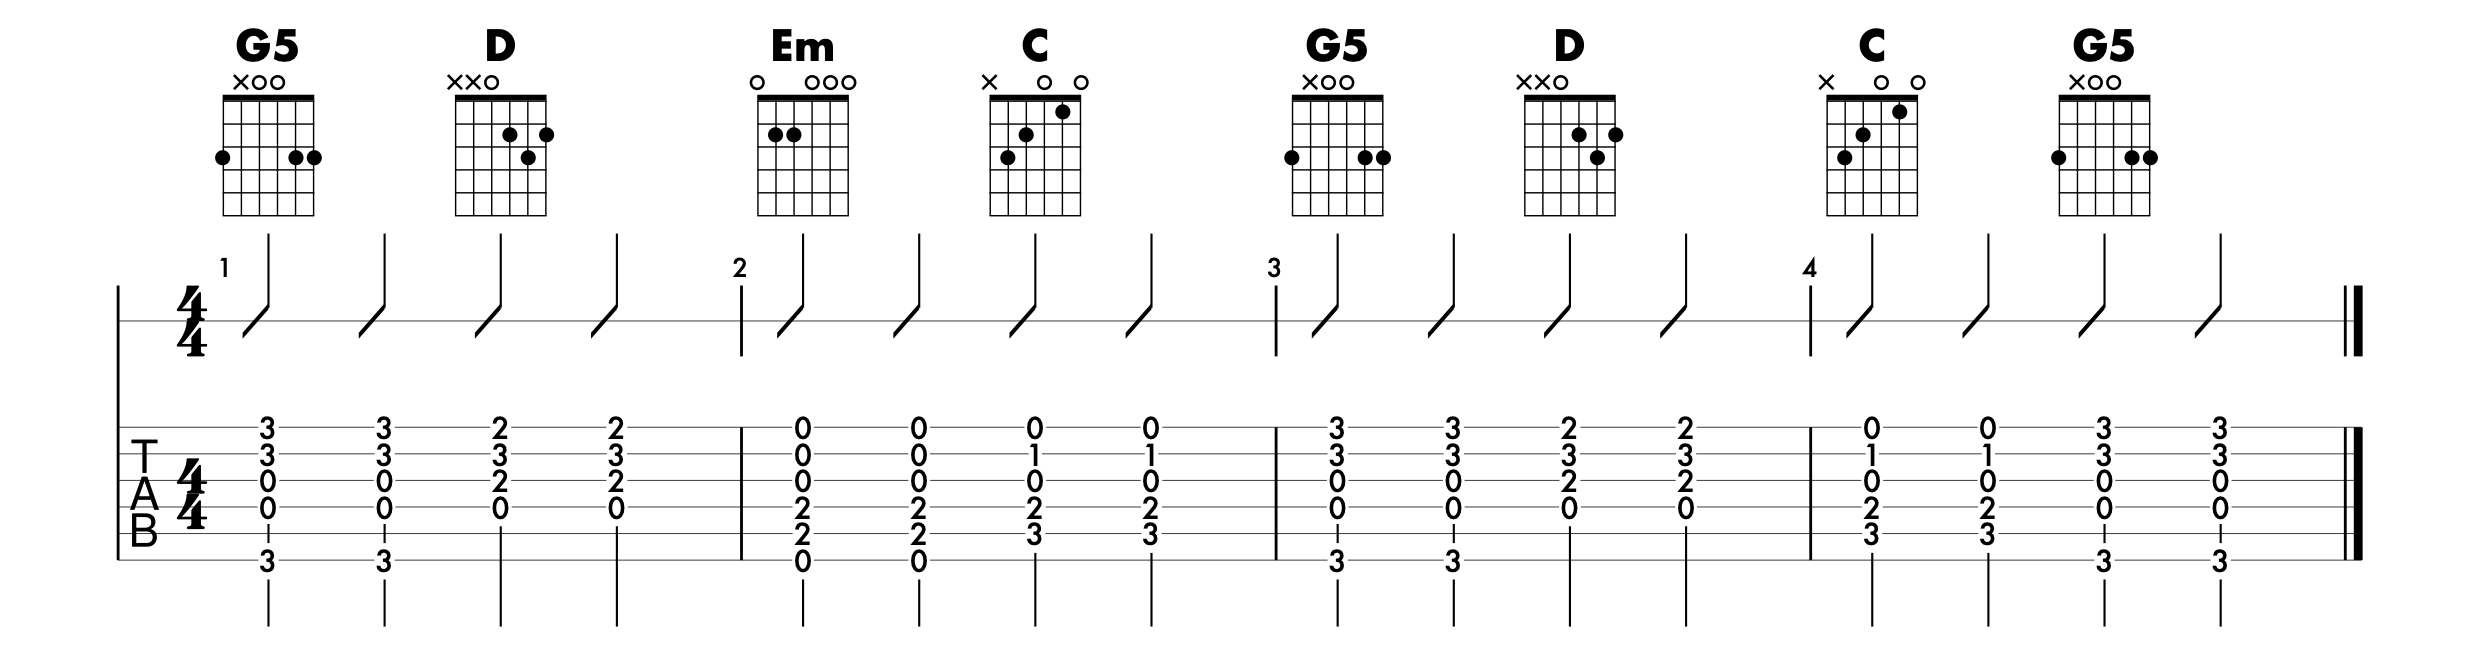
Fig. 1
Once we’ve gotten used to the shape of the chord progression and changing every two beats, we’re going to want to have a look at the descending bass line. This is one of the key features of this song and is what will really make it sound like you’re playing ‘Let It Be’ (even if you’re only strumming the chords and no one is singing along). The rhythm of our turnaround uses eighth notes, but we’ll still play them all with down strums.
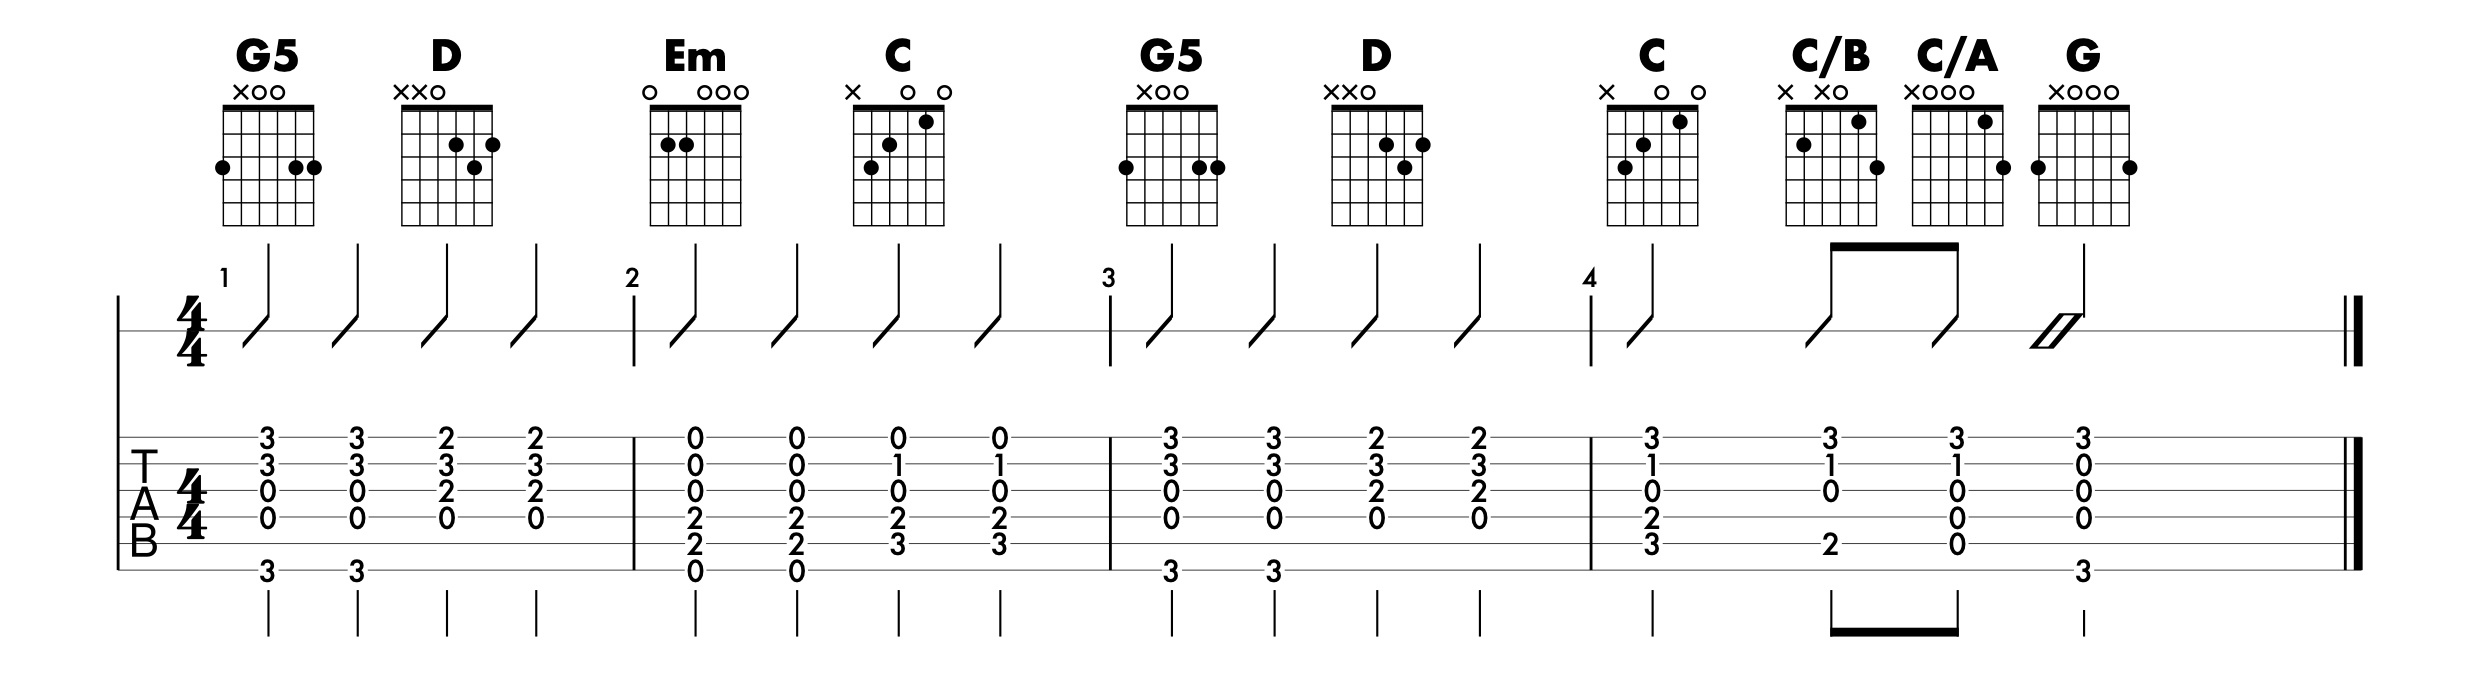
Fig. 2
As you are getting used to these chord progressions, make sure you are tapping your foot on the beat and counting out loud. It definitely isn’t the most exciting thing in the world and might actually make it seem harder. However, this is an extremely important step for integrating our understanding.
Tapping and counting will help you develop your skill as beginner guitar player.
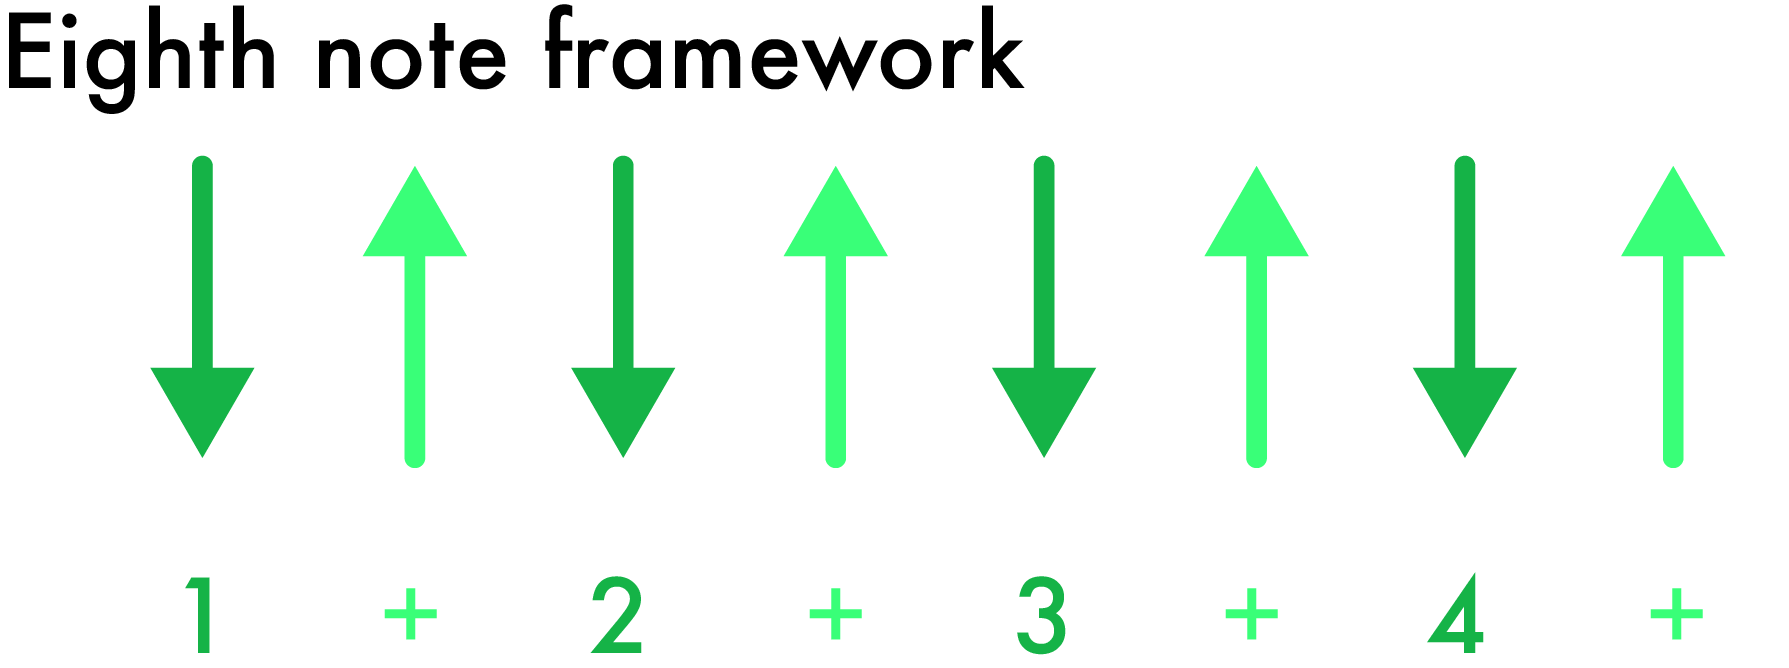
Fig. 3
So, we’ve got our head around the chord progressions and now we’re feeling confident with our descending bass line turnaround. Let’s try strumming the progression using a pattern from our eighth-note framework.
Pay attention to whether the notes in our pattern occur on the beat or on the offbeat. As per our eighth note framework, we will play every note that occurs on the beat with a down strum and every note that occurs on the offbeat with an up strum. In this case, we’re going to break the rules a little bit and continue to do down strums for our descending note bass line (we’ll see why soon).
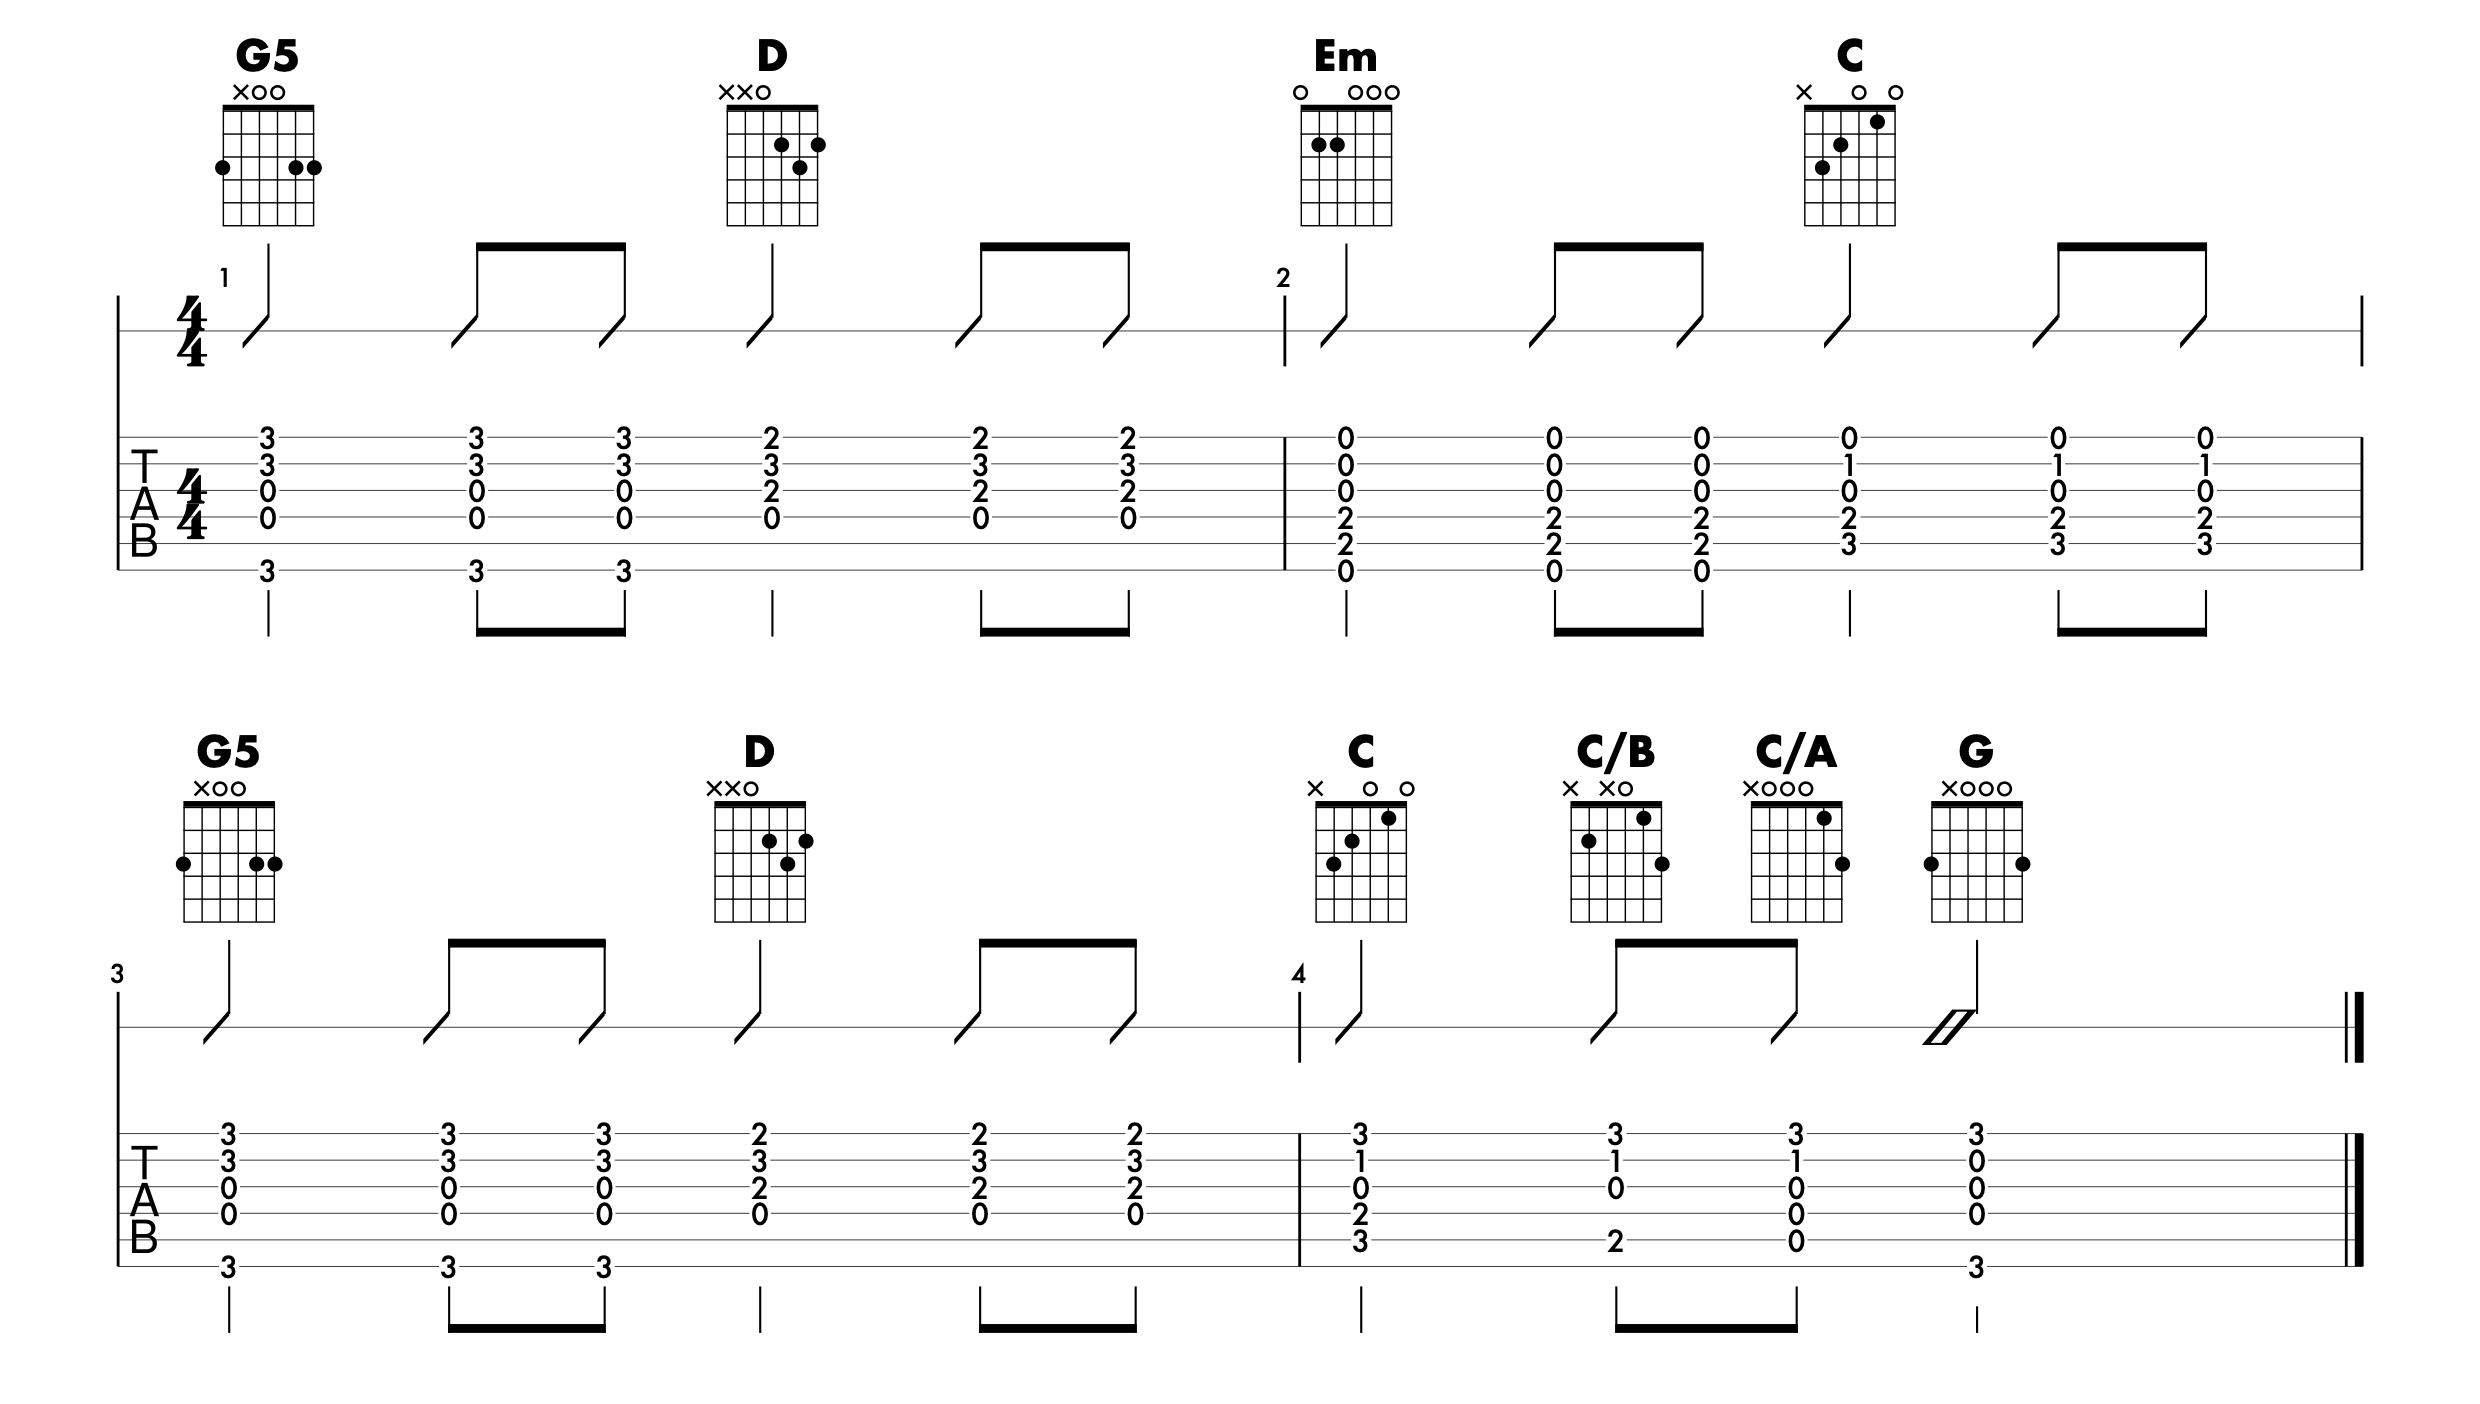
Fig. 4
Getting used to playing this progression with a pattern from our eighth note framework is a fantastic next step. However, ‘Let It Be’ actually uses a sixteenth note framework.

Fig. 5
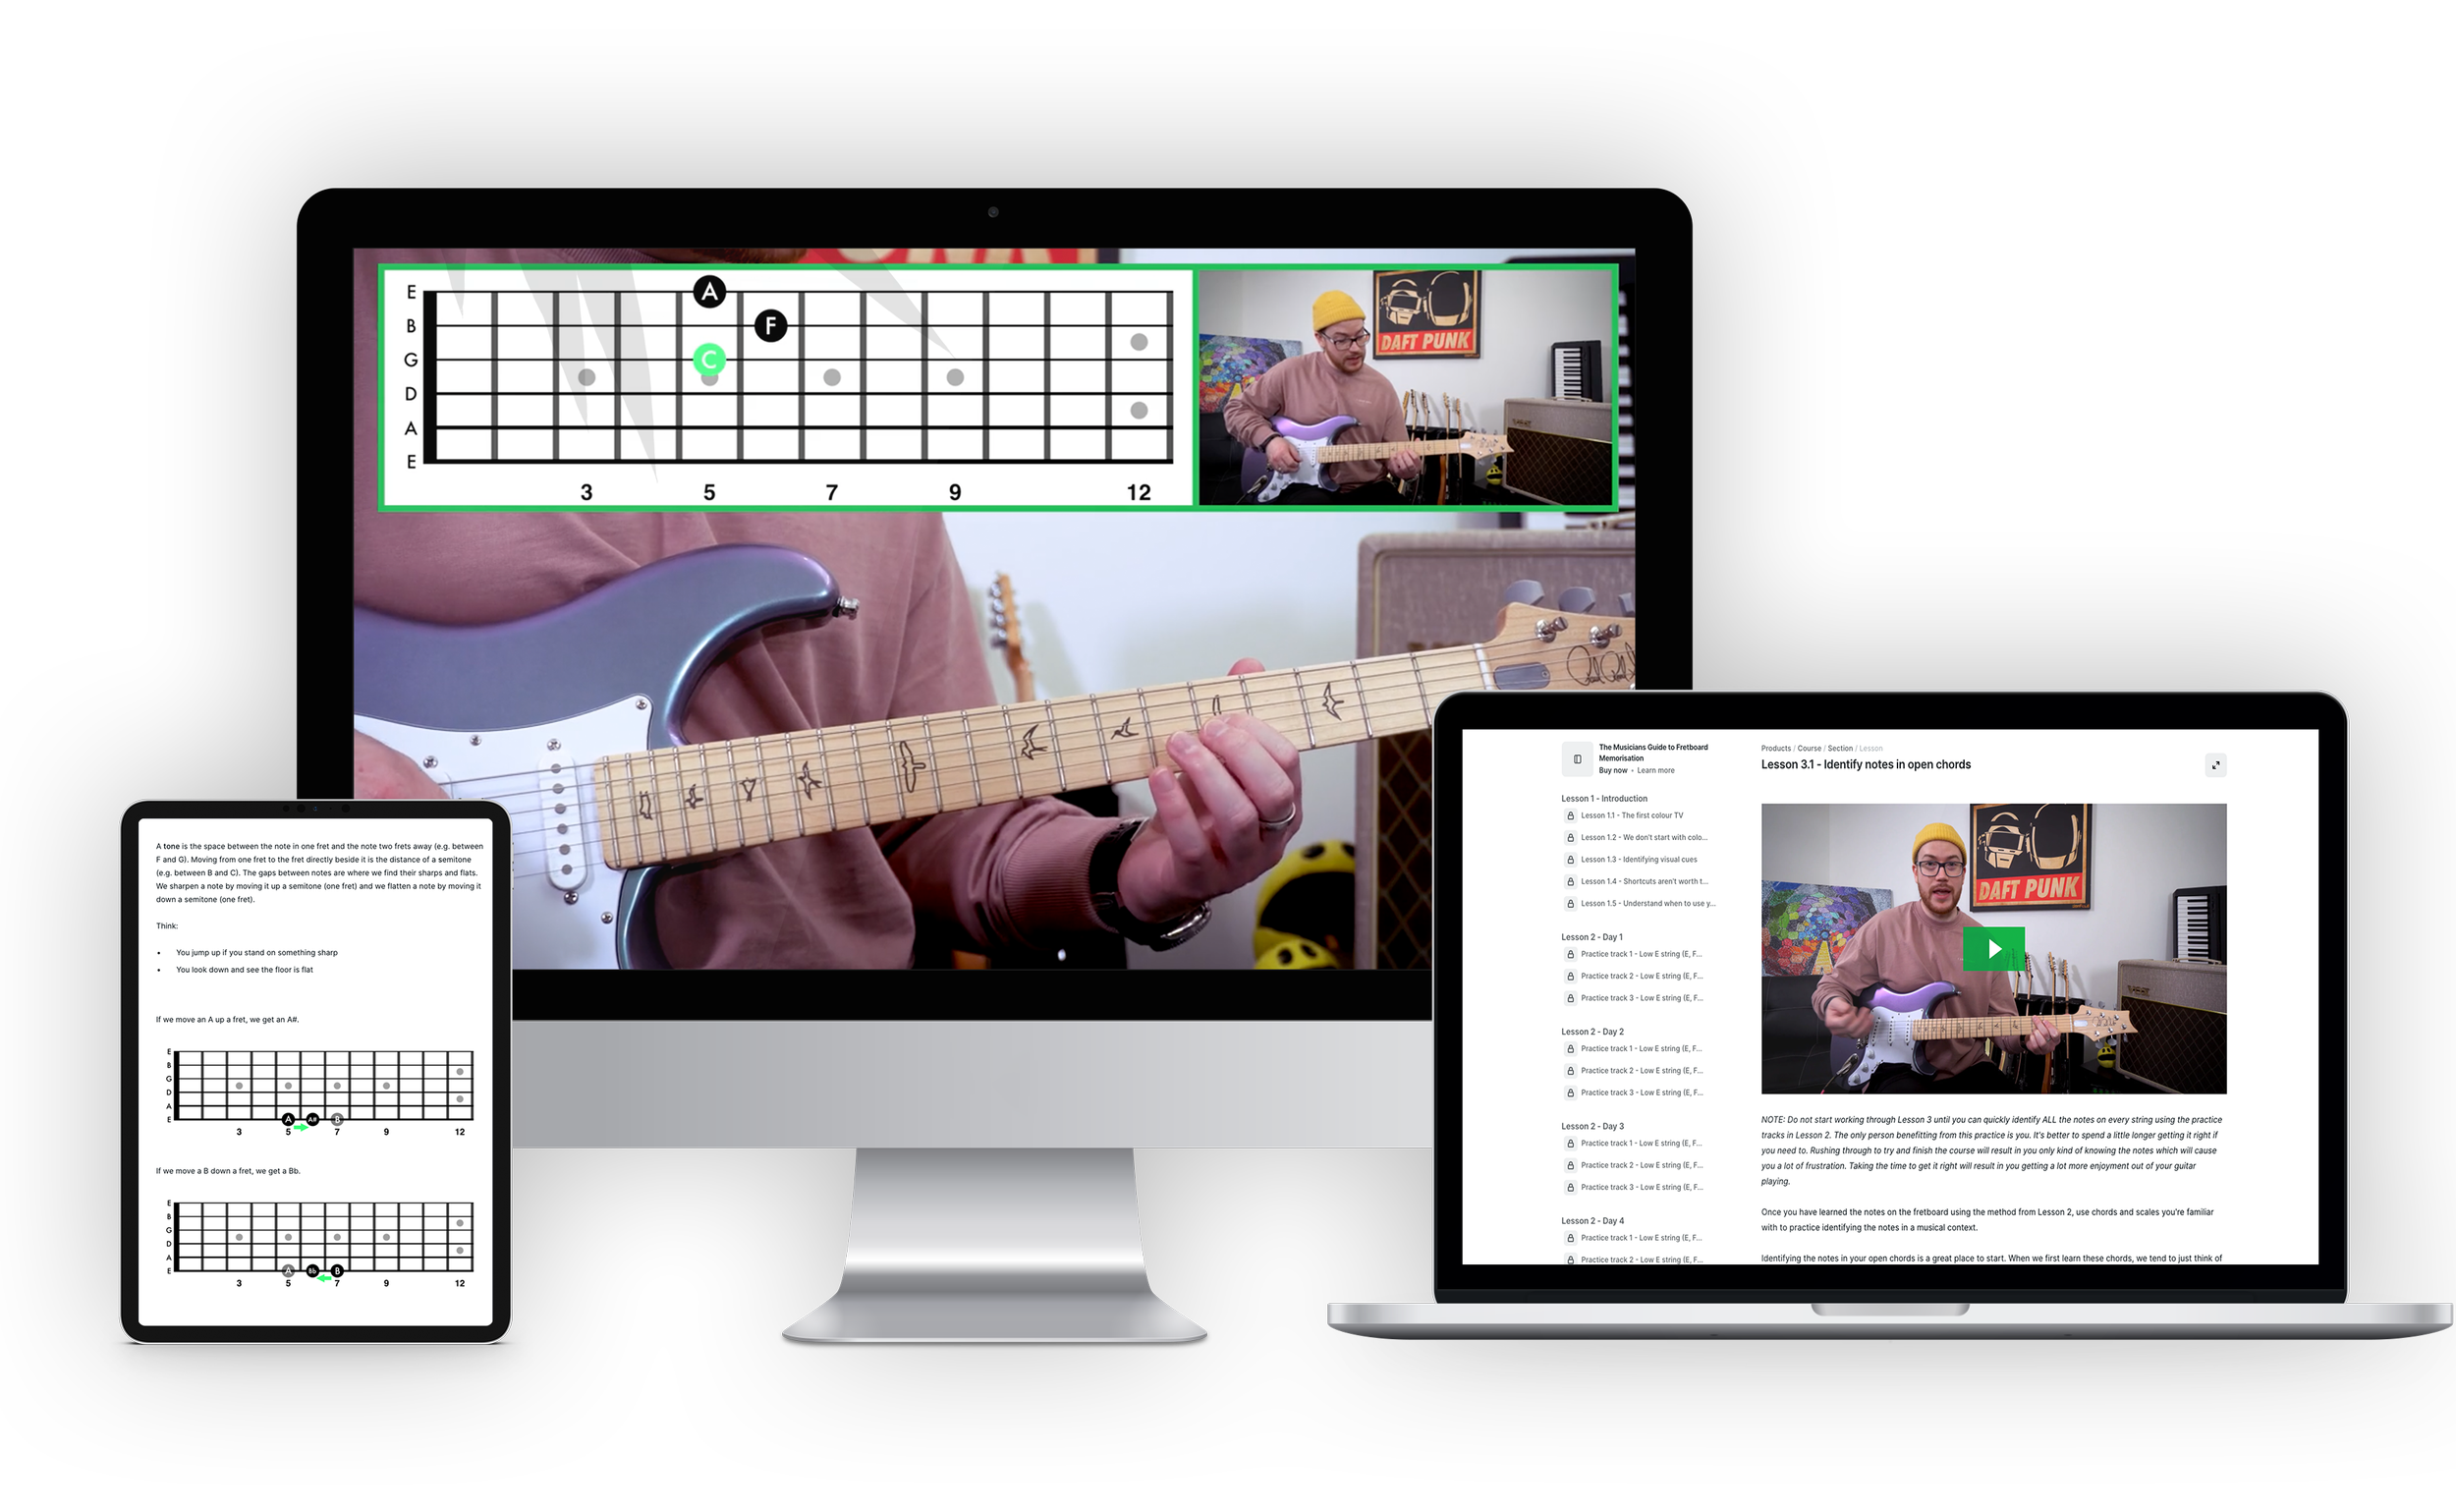
Discover how to learn the notes in a way that not only develops your fretboard fluency but reinforces your overall musicianship.
Just because a song uses a sixteenth-note framework doesn’t mean it has to be fast or have a super busy strumming pattern. We can still have a lot of space between strums. A sixteenth-note framework simply means that we are now dividing each beat into four possible slices as opposed to two possible slices. This means that in a sixteenth-note framework, we’ll now do down strums on the beat and on the ‘and’ (we played the ‘and’ as an up strum in our eighth-note framework). In a sixteenth-note framework, the up strums will occur on the ‘e’ and ‘a’ slices of the beat.
Here is a basic sixteenth-note strumming pattern that might work well when you’re playing Let It Be.
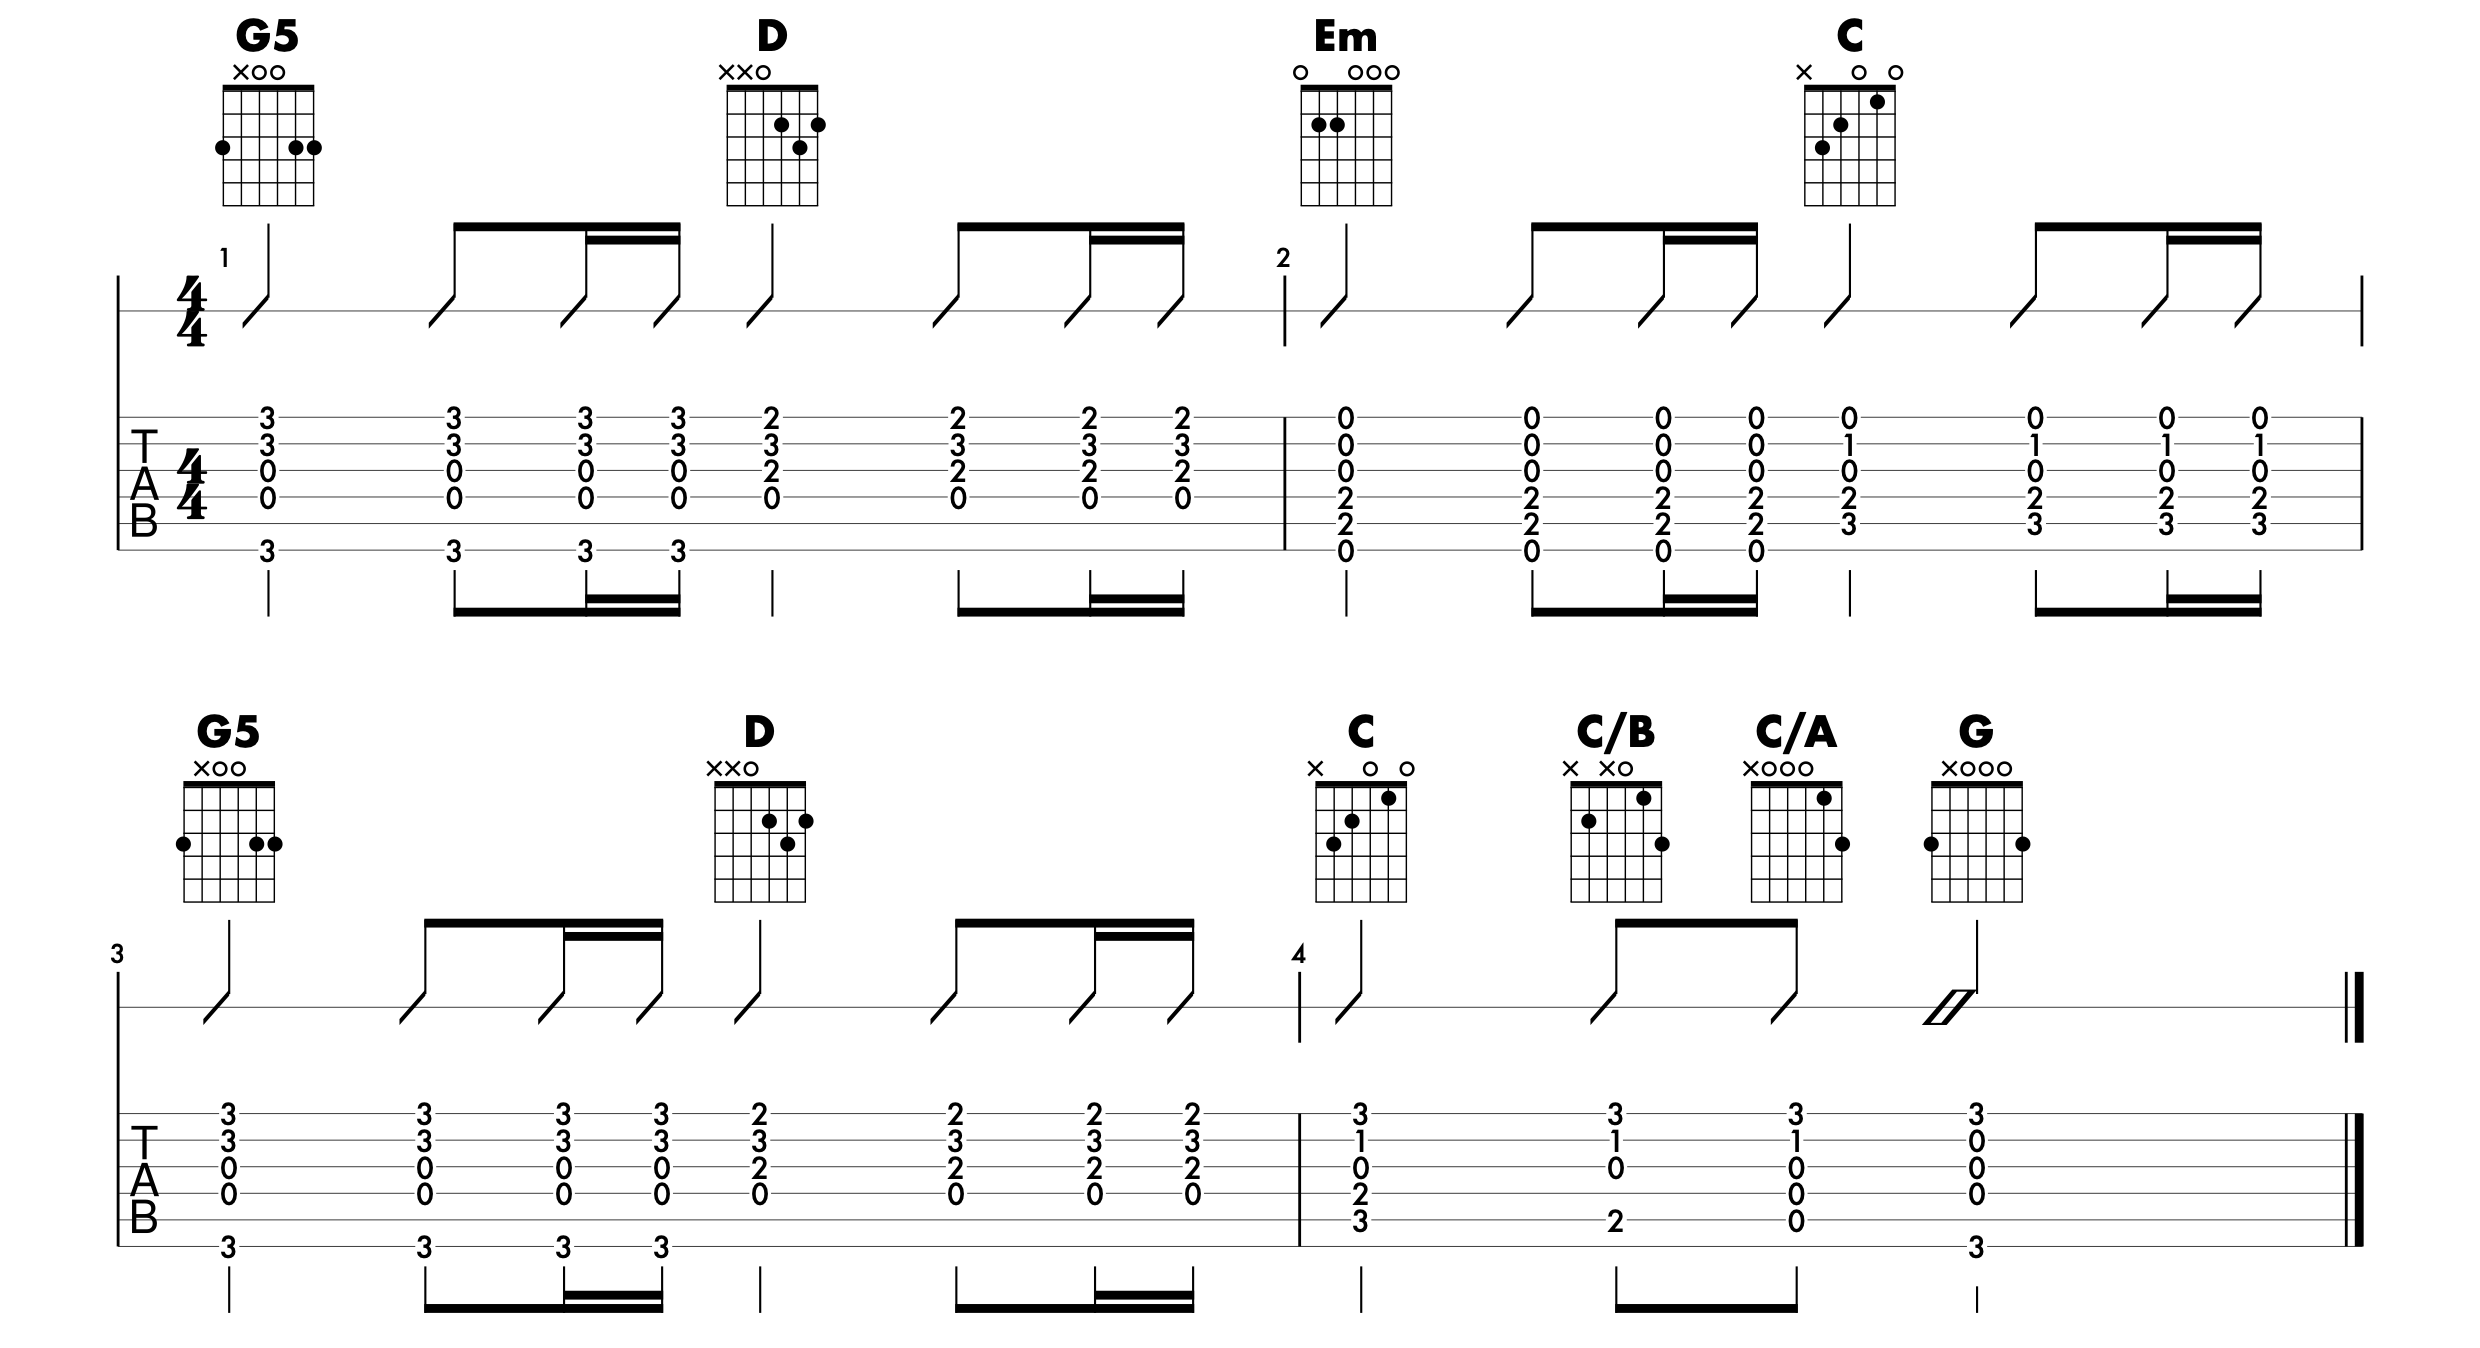
Fig. 6
This strumming pattern is fine, but it does sound a little mechanical. We want our strumming to feel a little more interesting and dynamic. We want it to feel like it belongs in the song without sounding like we’re sticking dogmatically to the script. We want to do this by varying our strumming pattern as we play. We could play every slice of our sixteenth-note framework, but it won’t sound good. We want to be selective about which slices of the sixteenth-note framework we play. This will help us create a fresh and interesting dynamic as we play the chord progression.
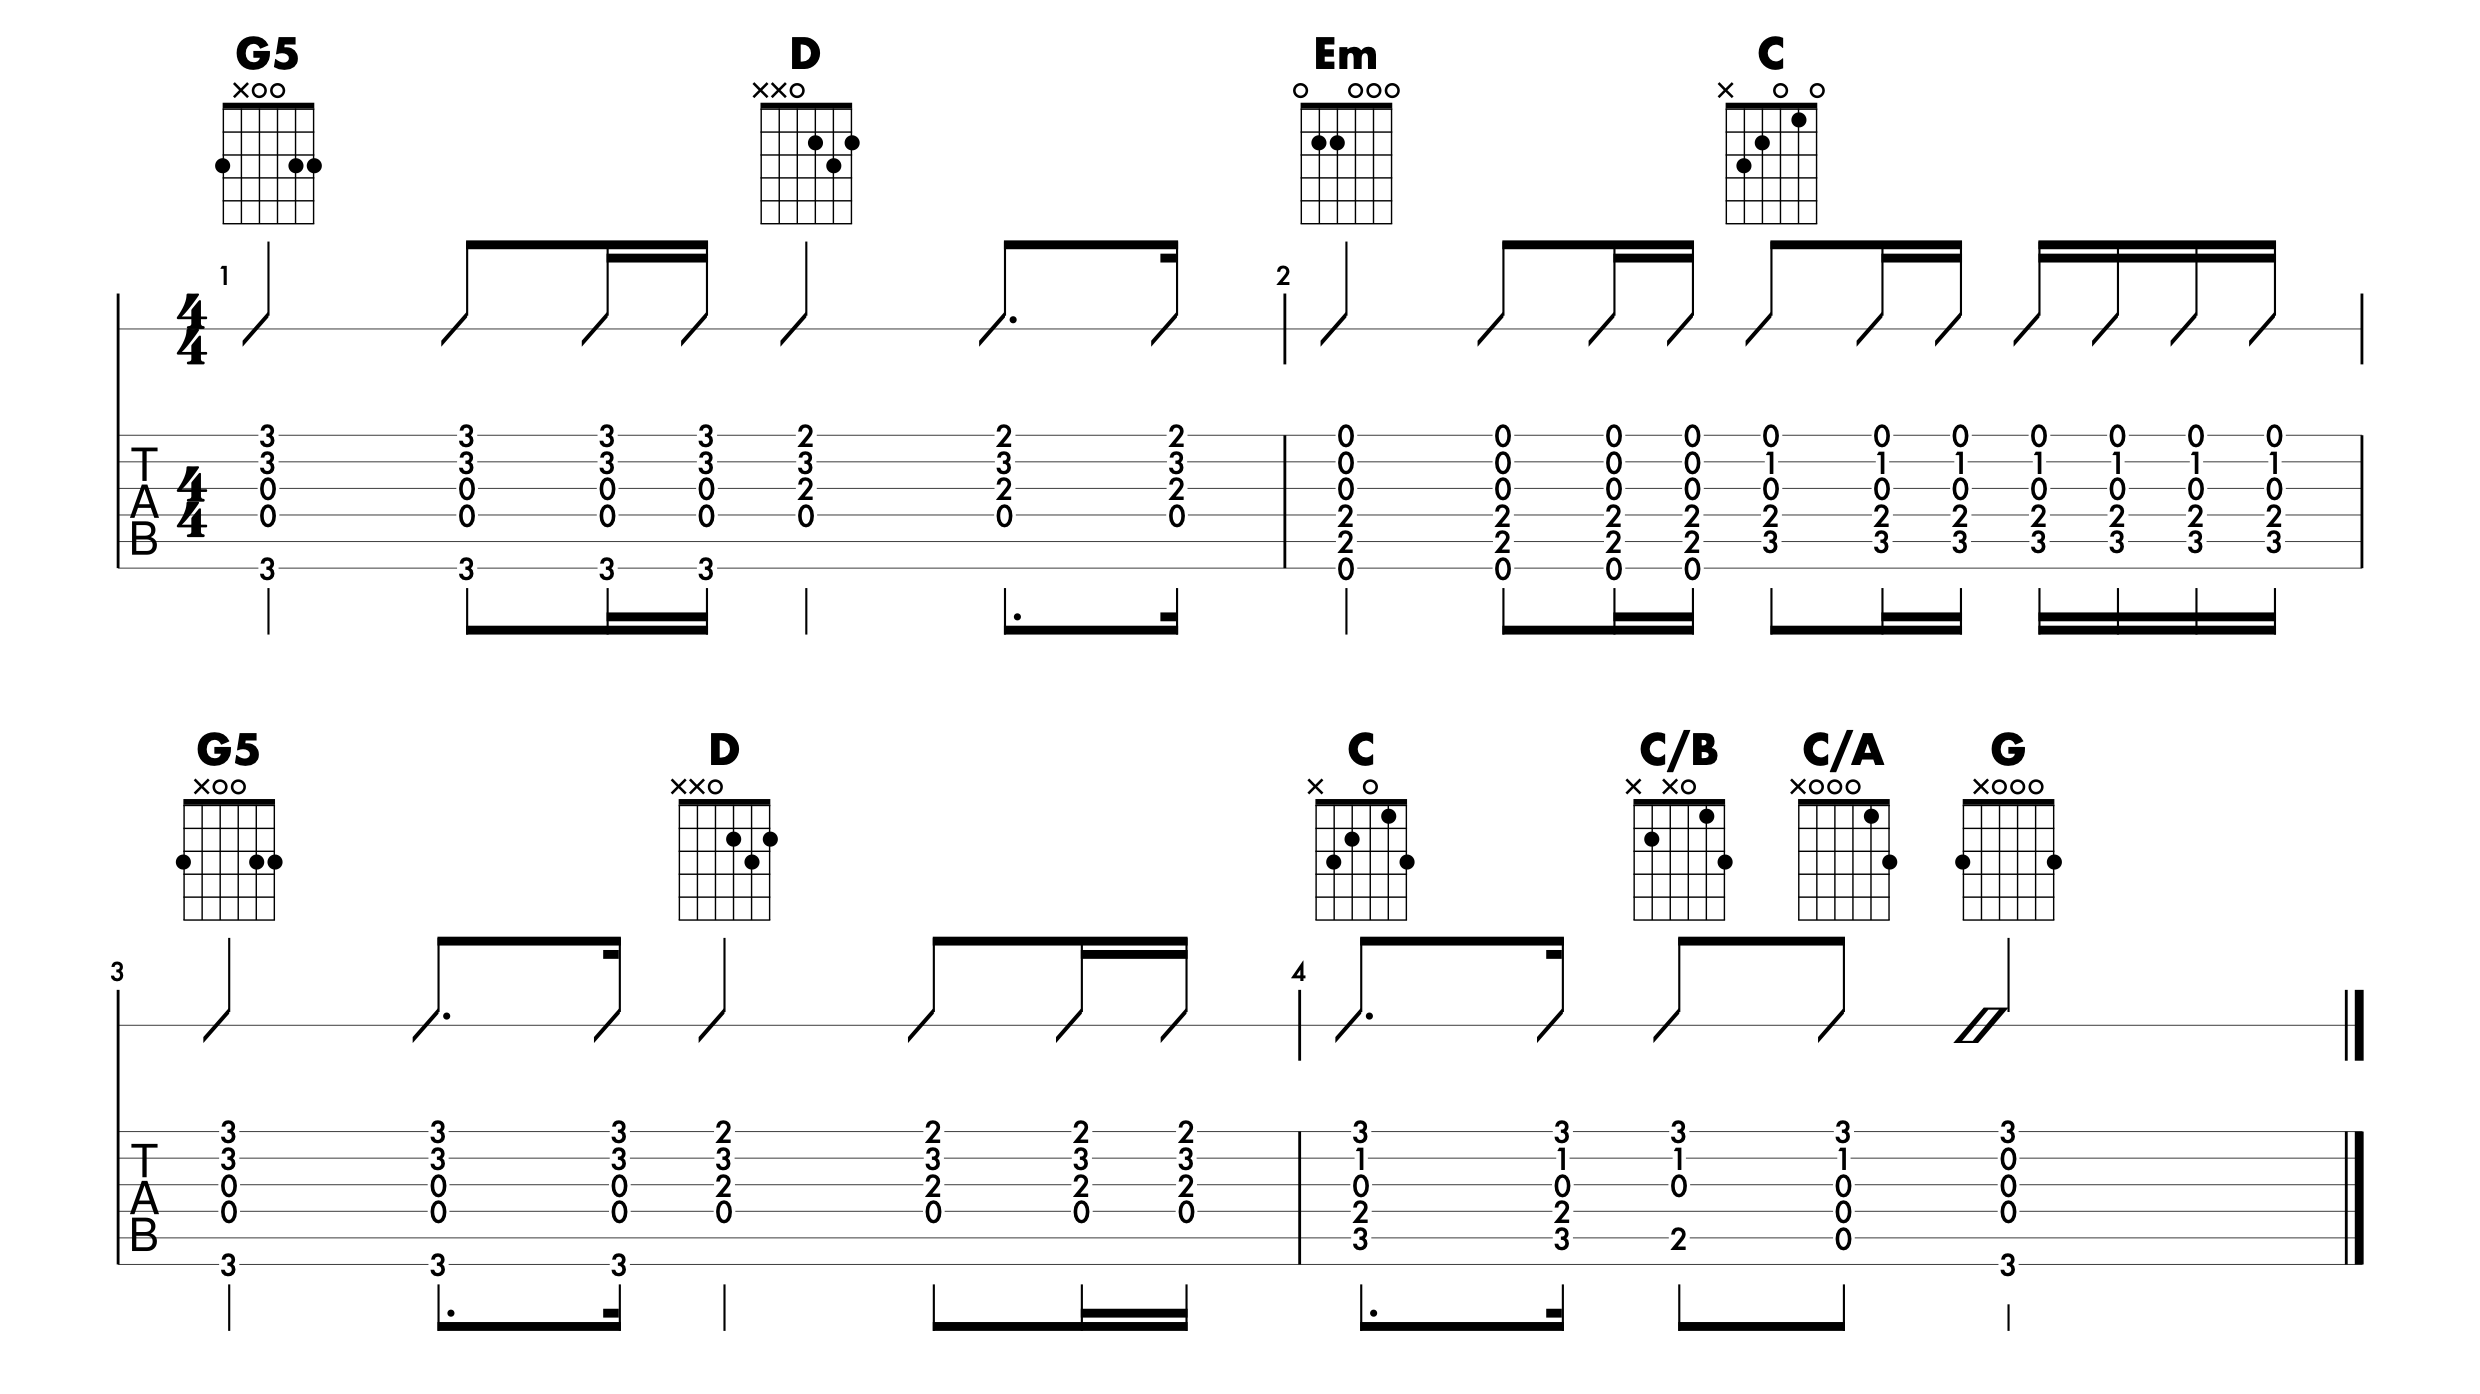
Fig. 7
In our sixteenth-note framework, we perform down strums on the beat and on the ‘and’. This means there is an extra down strum that we could play between beat one and two. However, we are going to leave this out. This will create more space at the front end of each chord. Rhythmic variation at the end of each will create energy that will carry us over to the next chord, where we’ll rest for a second by once again leaving space between our down strums. We are observing the principle of constant motion, we’re just creating variation by deciding which slices of the sixteenth note framework we want to play on the way past.
You’re never limited to playing a strict strumming pattern. You’re free to do whatever you want. Ultimately, it’s about whether your not you think it sounds good.
Here are a few variations within our sixteenth-note framework that you might like to try. As you’re practising them, pay attention to how the different patterns change the way you perceive the energy and rhythmic dynamics of the progression. One is not necessarily better than another. They are just different. Learning to appreciate these differences will help you develop an understanding of when might be a cool opportunity to use the variations in different progressions.

Fig. 8
This pattern is the original pattern from our sixteenth-note framework that we suggested using with the song. It’s a solid starting point from which to apply some of the variations demonstrated below. When we are thinking about creating variation within a strumming pattern, we don’t have to reinvent the wheel every beat. It usually helps to have some sense of what pattern you are using as a ‘starting point’.
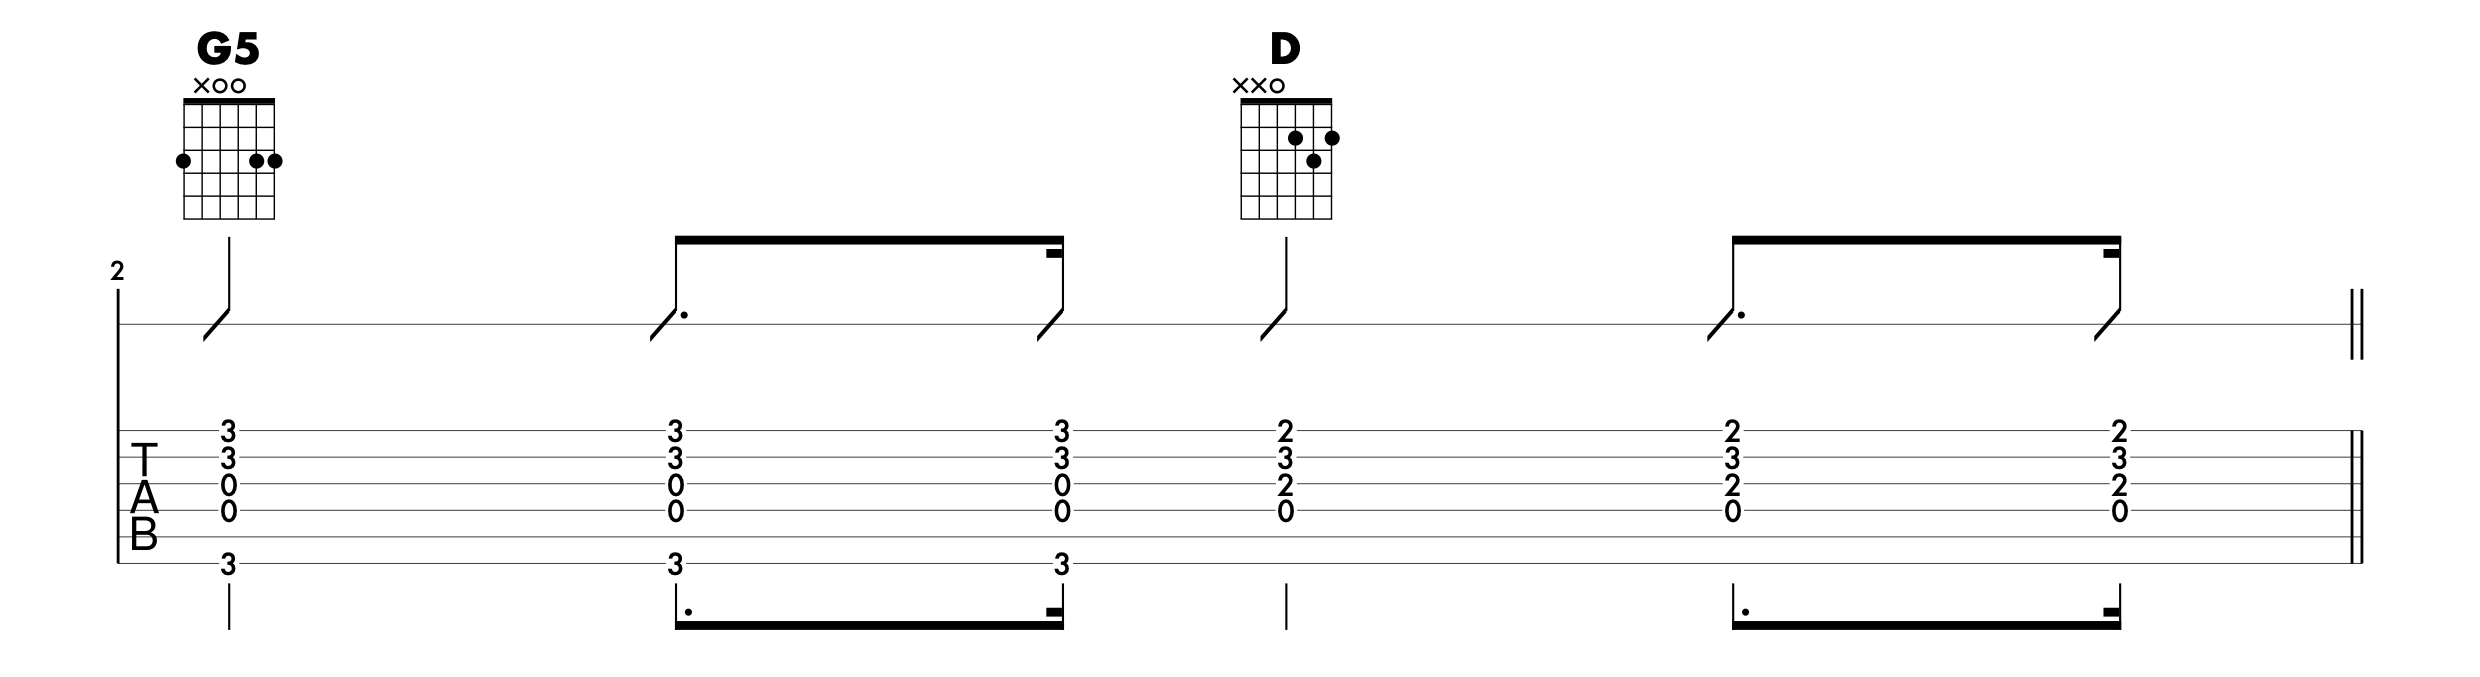
Fig. 9
This pattern is very similar to the first. However, instead of playing two sixteenth-notes at the end, we’re only playing the final slice. This will create more of a sense of urgency as we roll over into the next bar.
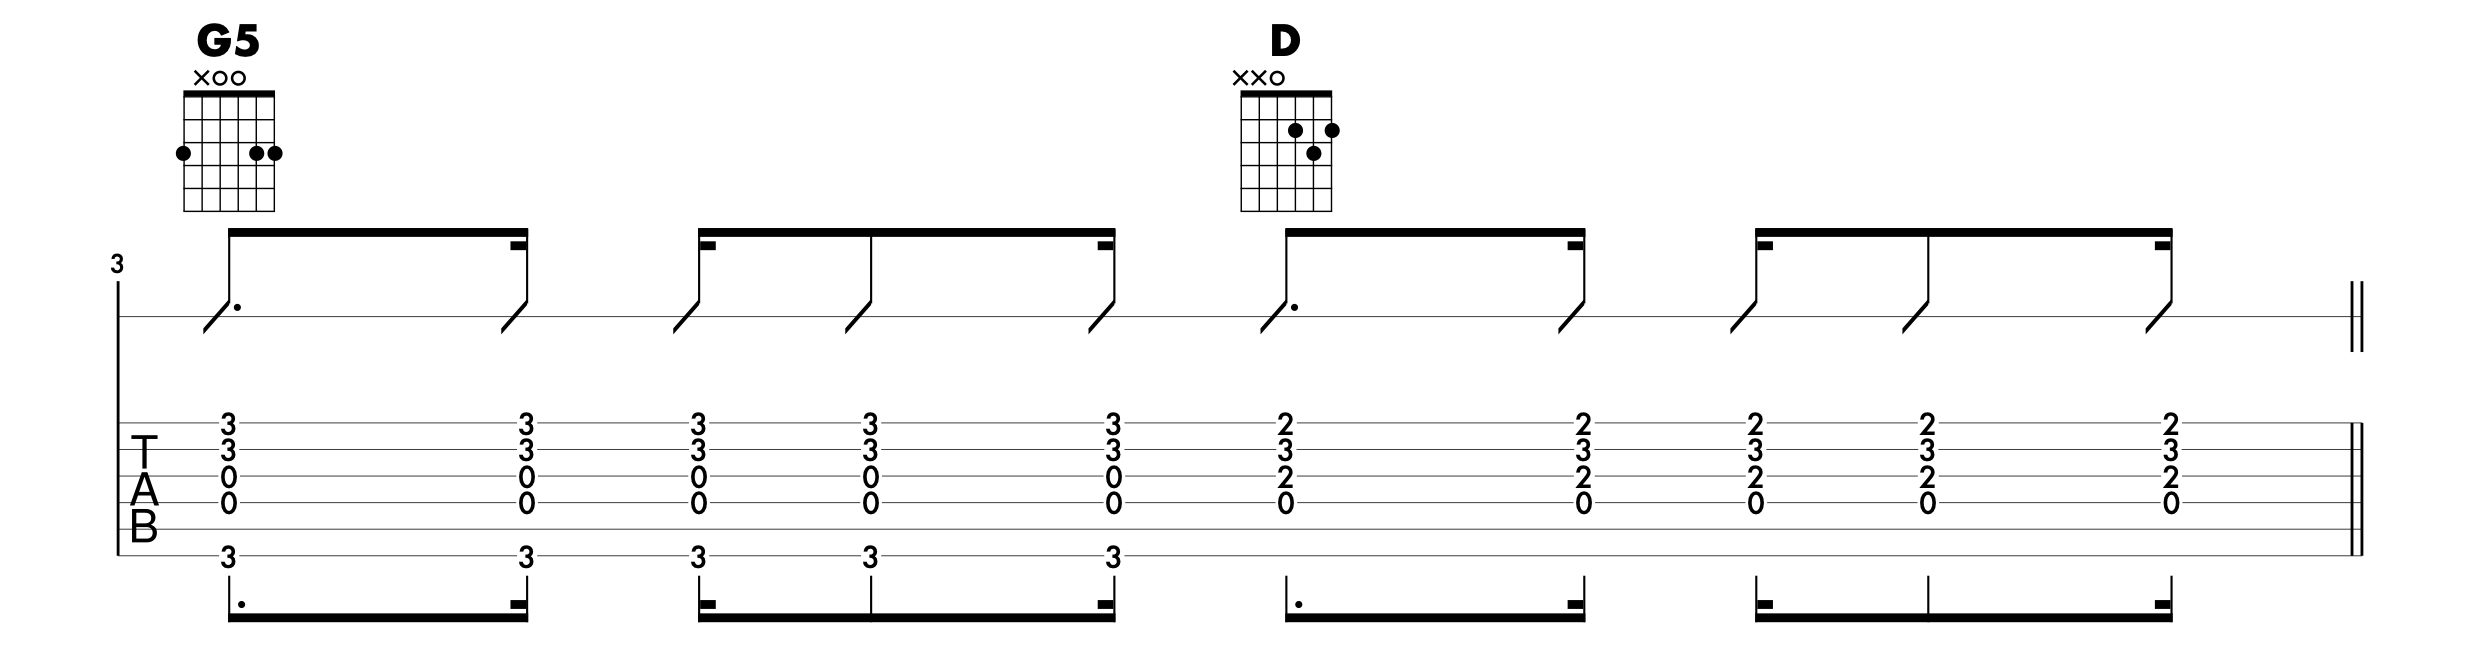
Fig. 10
This pattern is a lot busier in the middle portion, while still retaining the energy of the sixteenth note in the final slice.
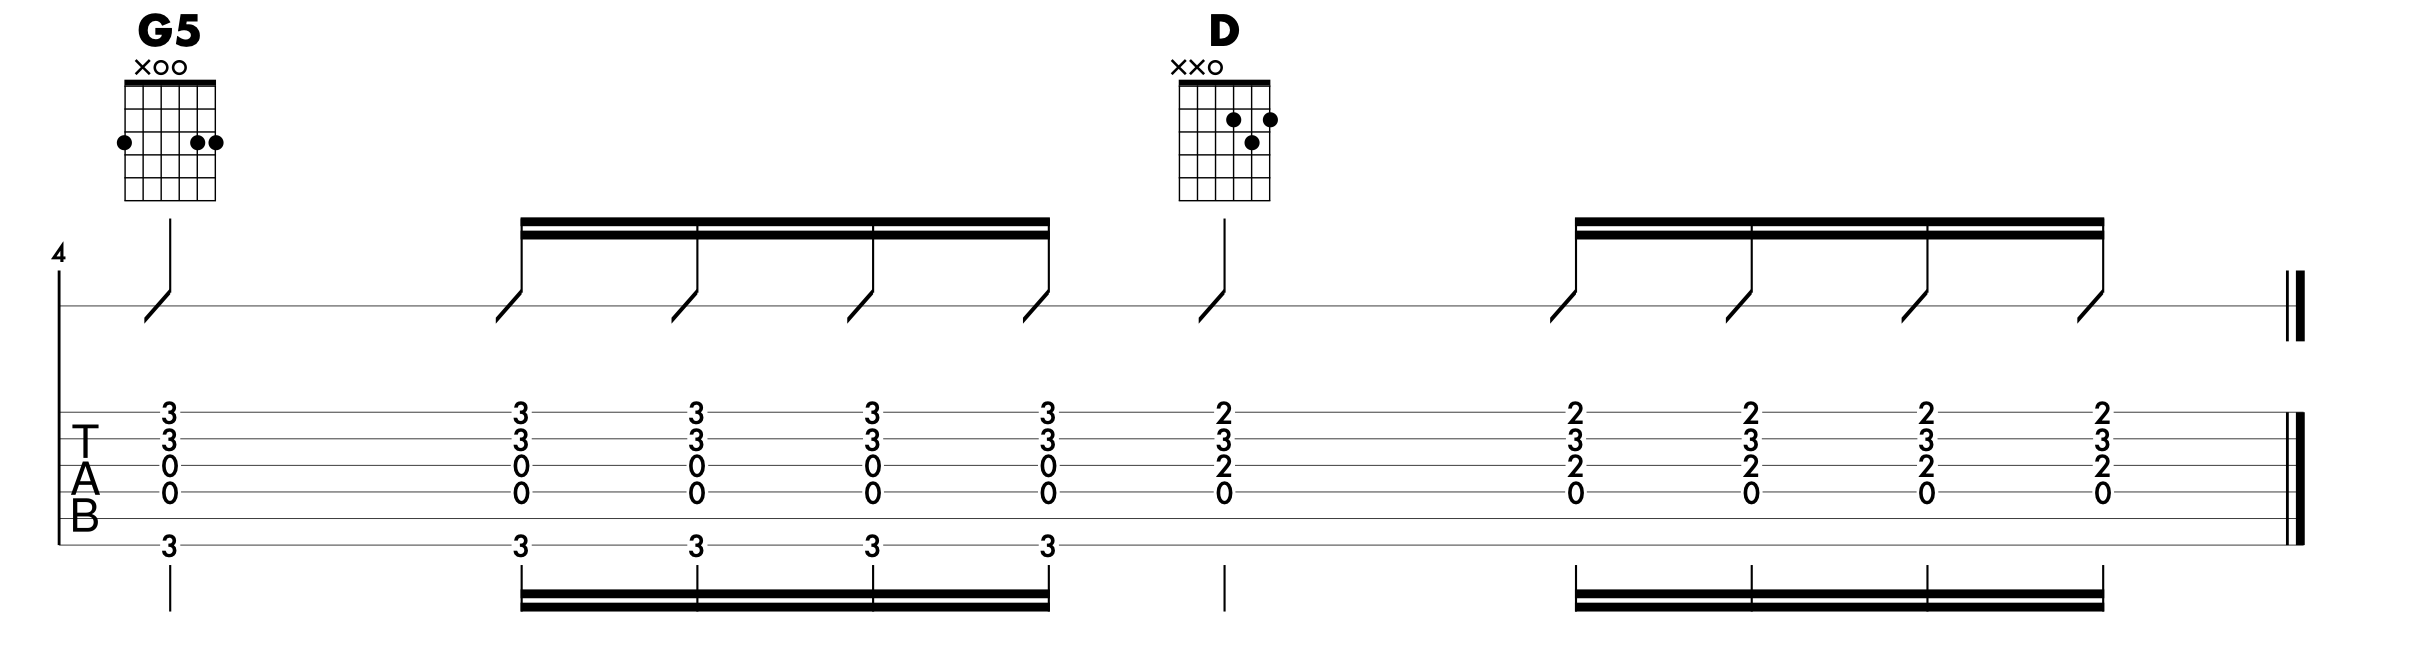
Fig. 11
This pattern plays all the sixteenth notes in the second beat, which creates a building feeling and gives a strong contrast to the quarter note played in the following beat.
It’s important to note that this is not an exhaustive list of strumming pattern variations you could play over this song. I’m sure there are others that would work just as well. Try using the sixteenth-note framework to come up with some of your own.
Here are the chord voicings that I used to play this arrangement of ‘Let It Be’.
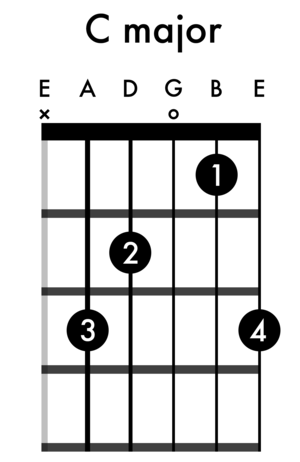
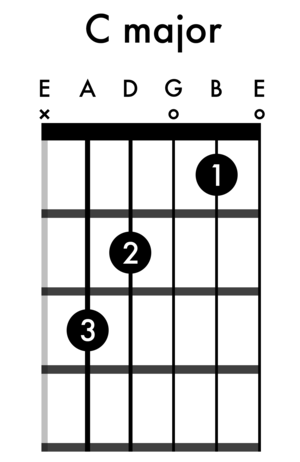
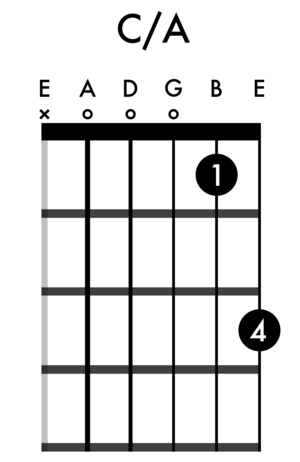
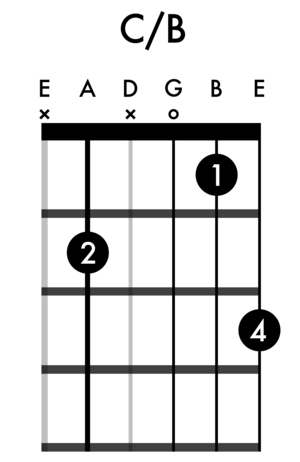
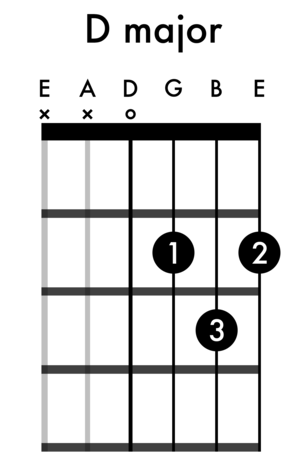
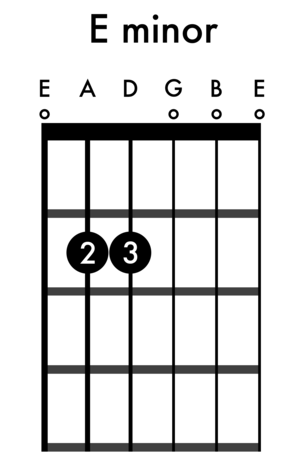
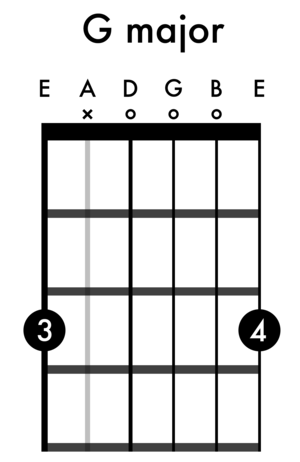
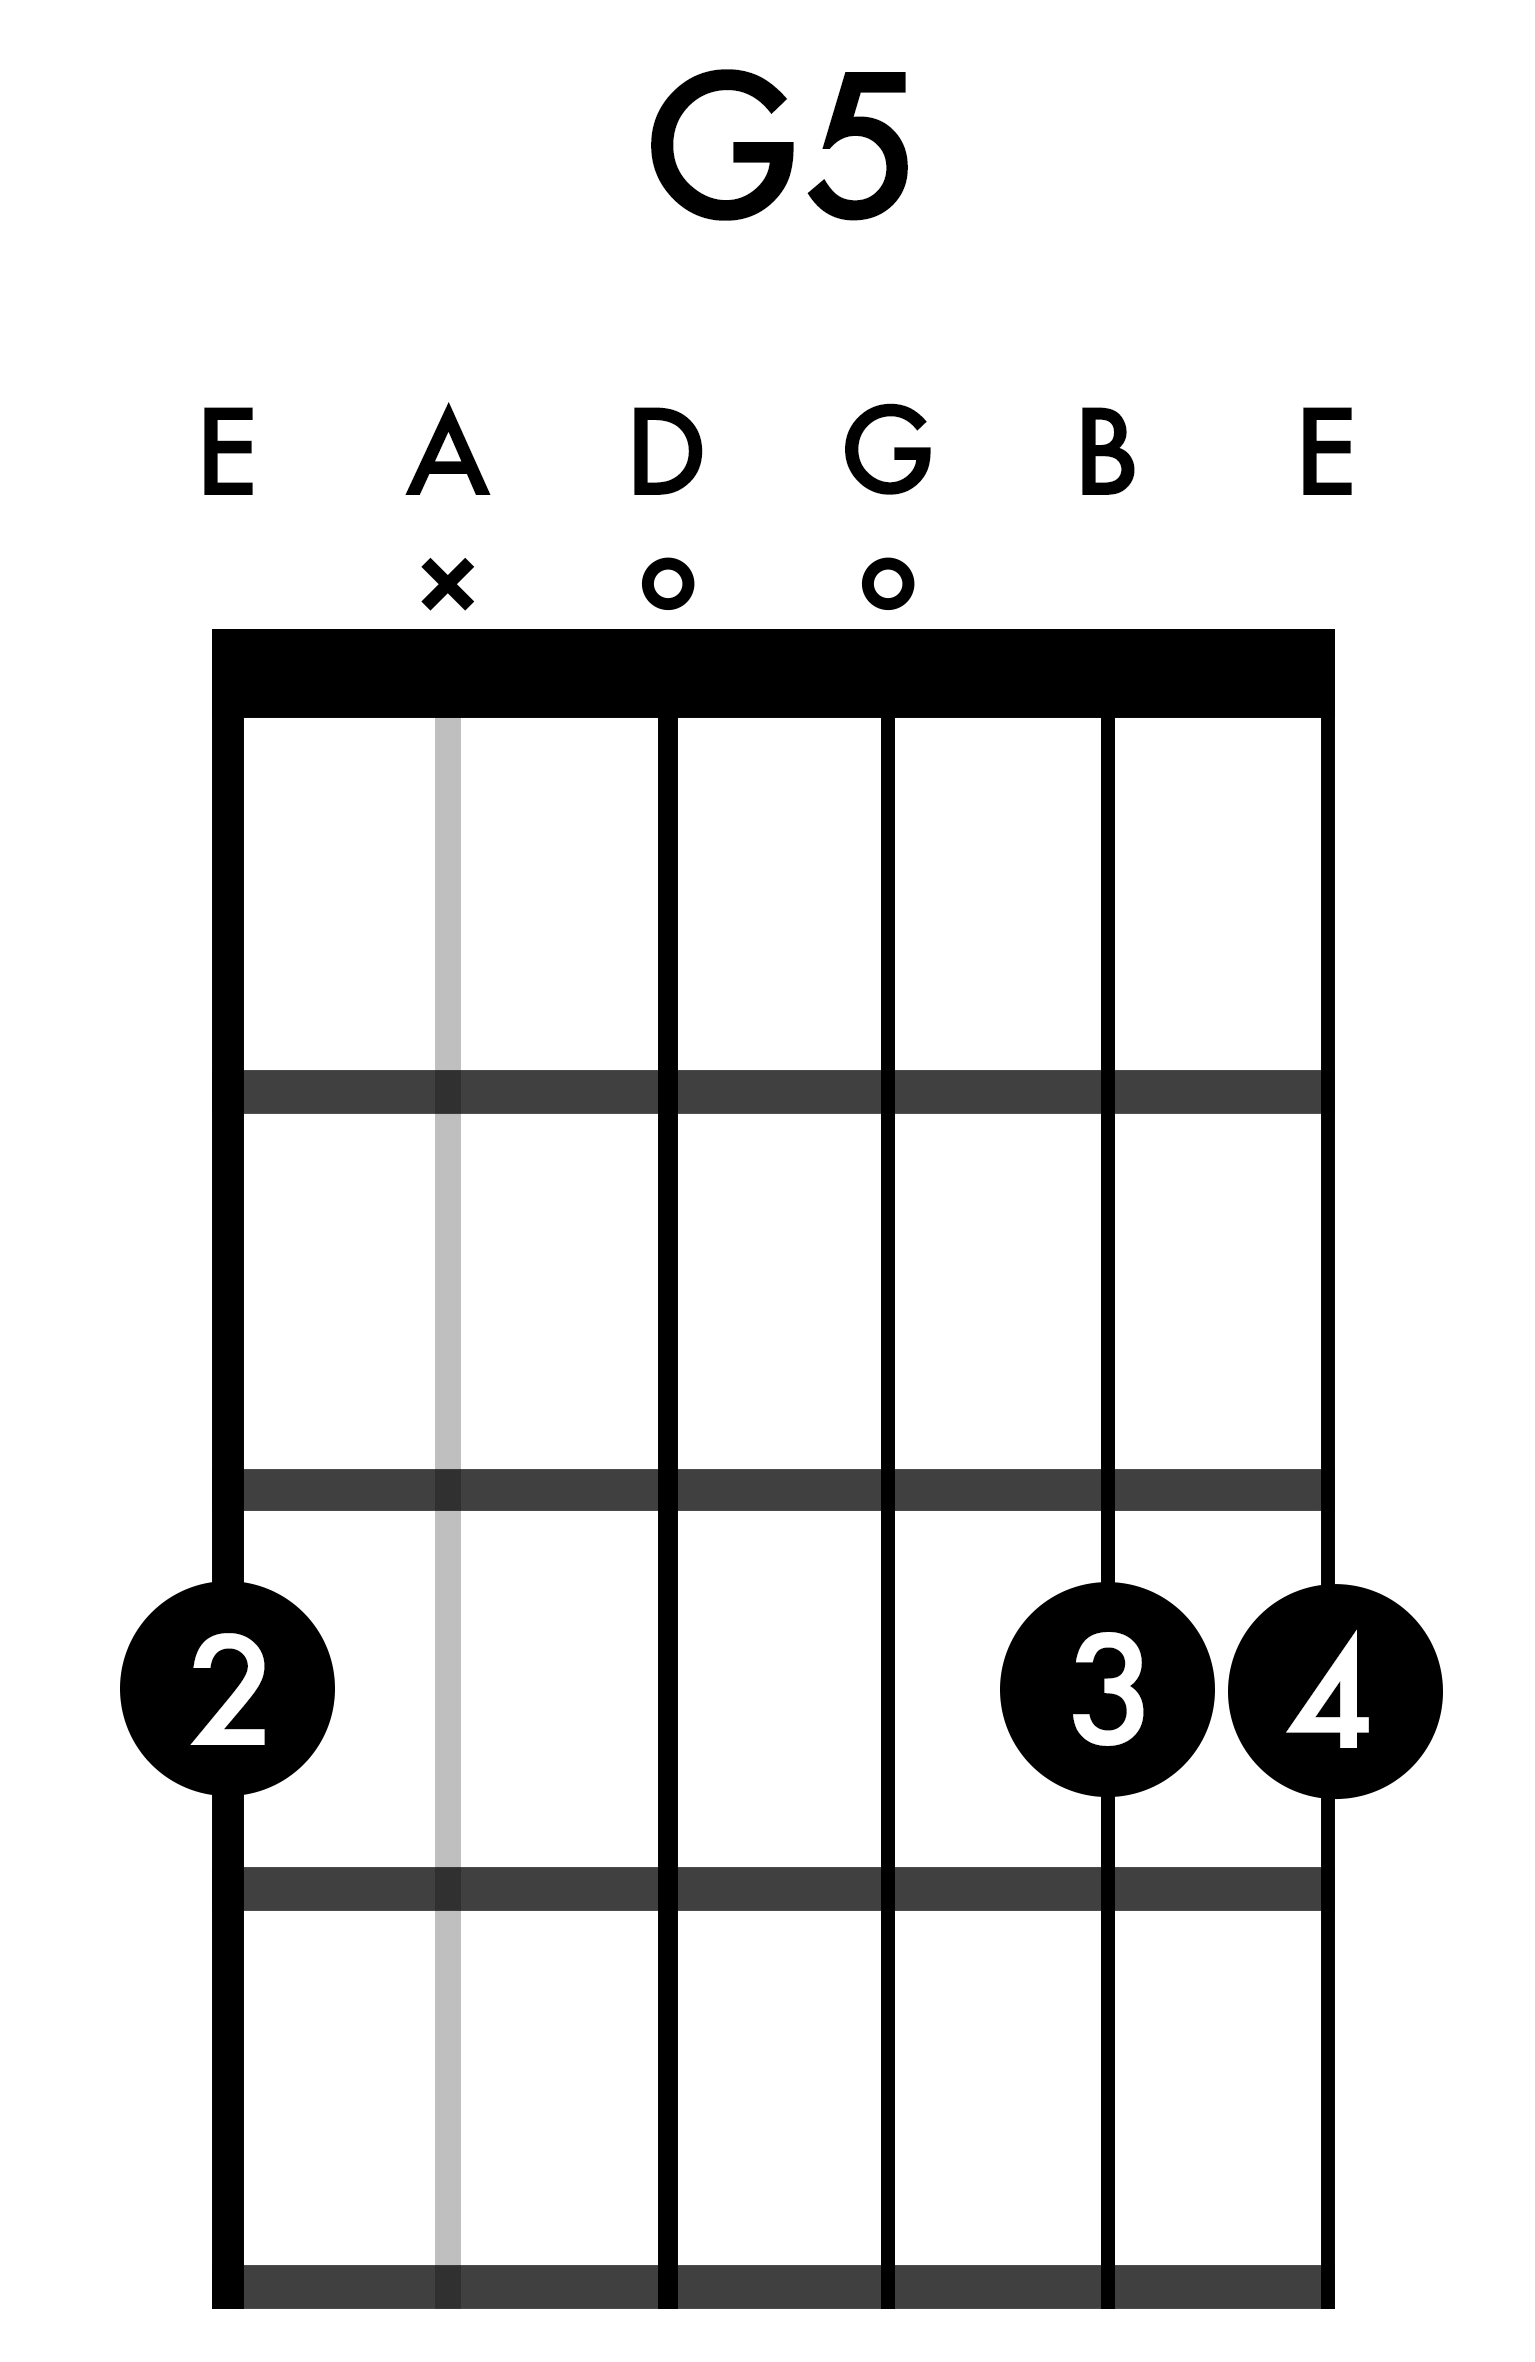
Having some variations of your favourite chords up your sleeve can be a great way to add some more movement and energy to your progressions from a harmonic point of view. In this arrangement, I am using two different voicings of both a C and a G chord. Technically, a G5 chord is a power chord and not a major chord. But, you can generally use this shape pretty interchangeably (I actually prefer it to a traditional G major shape).
Another great aspect of the descending bass line is the opportunity it gives us to develop independence of movement in our fingers. In this progression, practice leaving your first and fourth fingers on the strings of the C shape while you play the bass notes with your other fingers.
Check out the full chord progression for ‘Let It Be’ below.
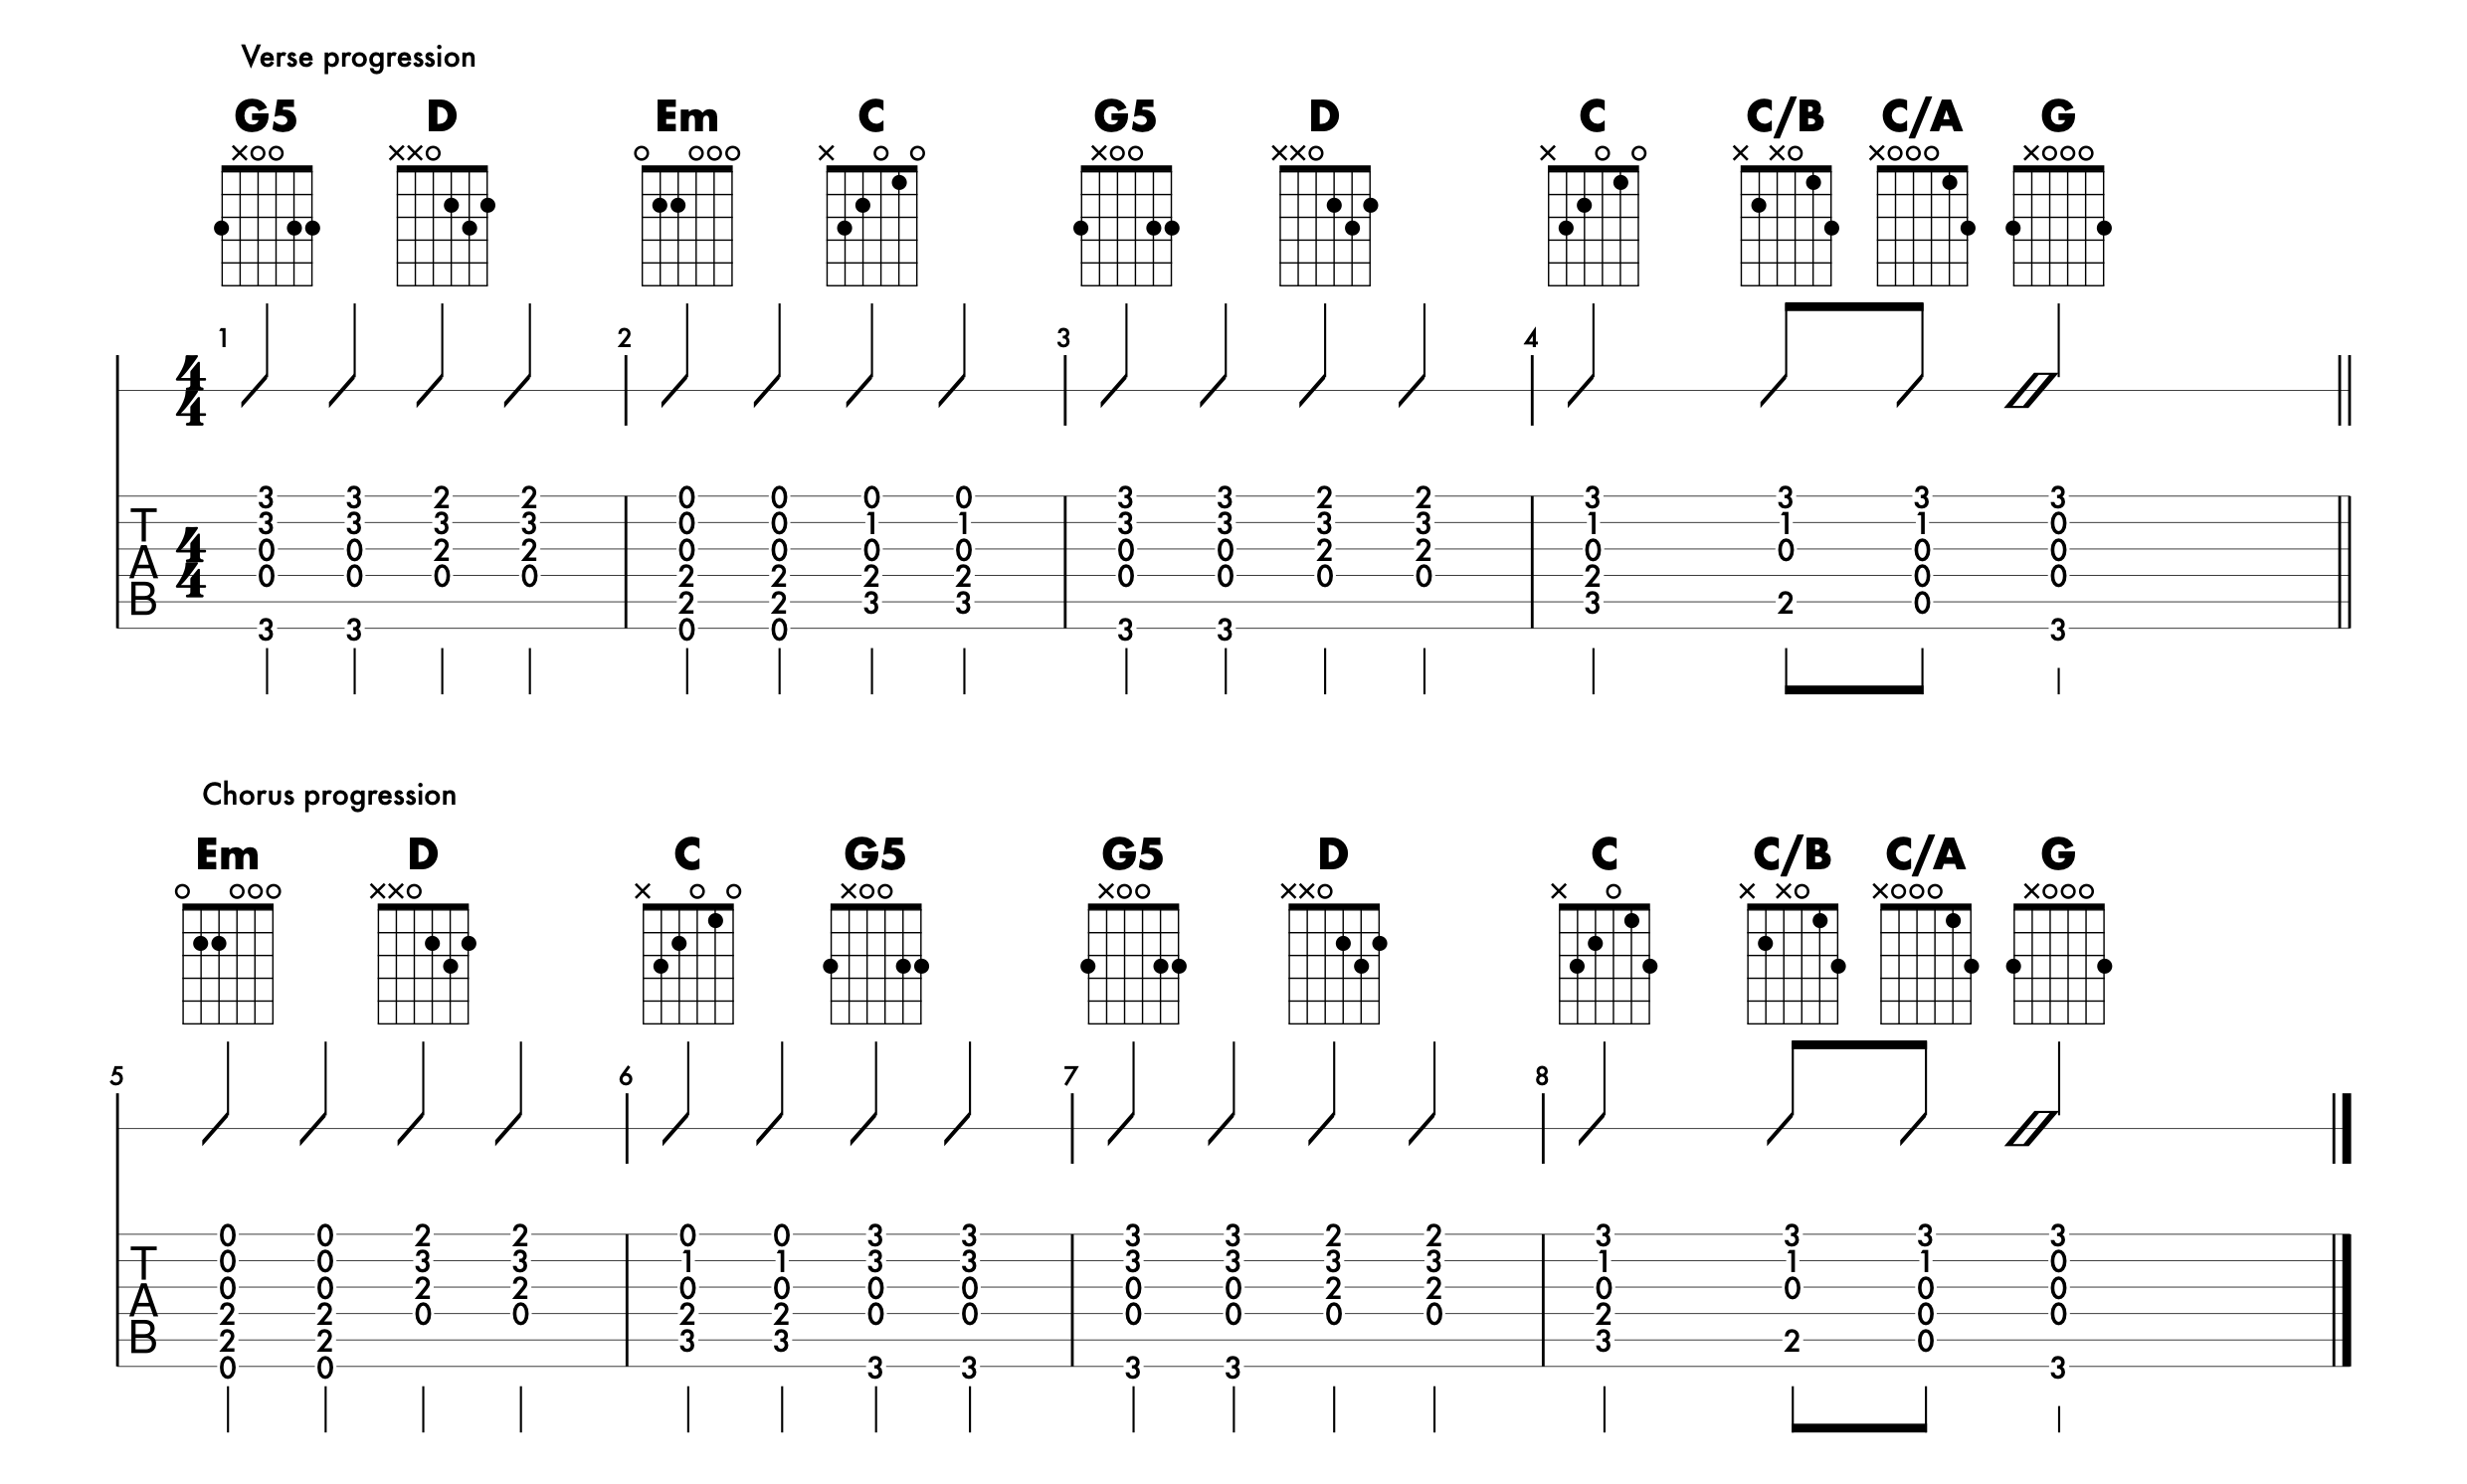
Fig. 12
Remember, there is no “correct” way to play this song.
This particular arrangement is one that I think gives beginner guitar players the opportunity to practice a lot of important skills.
Ultimately, the best arrangement is the one that you enjoy playing!
If you want to play along with the recording using these chord shapes, use a capo on the 5th fret.
A guitarist who has learned all the notes on the fretboard: Can more effectively learn scales and chords; Has a better understanding of keys, intervals, and scale degrees; Is able to more easily memorise songs; Has a greater capacity to understand music theory; Is more effectively able to develop their aural skills; Gets ‘lost’ far less frequently when they are improvising on the guitar.