
The most important exercise to get good at the guitar
This week I had someone ask me what I would choose if I could only practice one exercise for an entire year. What would my hack be to maintain my technique and make sure I’m still a good guitar player after one year of not playing the guitar?
I didn’t even have to think about the answer. There is one exercise I’ve always said is the most effective way to improve your technique. Period. In this lesson, we’ll talk about how to get the most out of the Caterpillar Exercise and look at the benchmark we’ll want to make sure we can hit if we consider ourselves competent guitarists.
The best exercise for developing our skills as guitar players
The Caterpillar Exercise is the first thing I do 90% of the time when I sit down to practice. If we’re strategic about how we approach this exercise, it becomes a practice tool that will help us get better at playing chords, lead guitar riffs, and develop the strength and dexterity we need in our hands to be able to do all the things we want to do on the guitar.
Playing the guitar is a physical activity. The strings of the guitar are under tension; it requires a lot more strength in our hands to get a good sound on the guitar than an instrument like the piano, which basically just requires pushing a button. If you’ve worked out with a personal trainer at the gym, you’ll know that doing exercises incorrectly won’t help you get any stronger. You won’t develop the right muscles and you’ll possibly even hurt yourself! We want to keep this idea in mind as we’re learning the Caterpillar Exercise. If we make sure we’re doing it correctly, we’ll find it’s an extremely effective tool to develop the strength and dexterity we need for all kinds of skills and techniques on the guitar.
How to get the most out of your practice
When I was younger and working towards my Grade 8 electric guitar exam I used to practice scales in front of the TV. Unfortunately, this isn’t something we want to do while we’re still developing as guitarists. It doesn’t count as effective practice if we sit there watching Netflix, mindlessly running our fingers up and down the fretboard; effective practise requires us being mentally engaged. When we practice, we are intentionally trying to connect our intellectual understanding with our physical and aural understanding. In this situation, your brain is the personal trainer and your fingers are working out at the gym. They’re trying their best, but they don’t actually know what they are supposed to be doing. It’s the job of your brain to supervise their performance and make sure they are doing the movements with good form. Once they have done it a few times, they’ll start to develop muscle memory on their own and you won’t have to supervise them as closely to know you are playing with good technique. Then you can practice while watching Netflix.
As you’re practising, shift your attention between your left and right hands to make sure that you’re doing everything mentioned below correctly. If you finish the exercise and can’t remember if you made any mistakes, that’s a good sign that you’re playing beyond your capacity to remember. Next time, try and focus specifically on that particular aspect of your technique. It’s okay to focus on different aspects of your technique each time you do the exercise. When we’re starting out there are a lot of things to keep track of! If you’ve tried it a second time and still can’t remember if you’ve made any mistakes, you might want to think about trying it a little slower.
How to play the Caterpillar Exercise
Let’s discuss how to play the Caterpillar Exercise. Once we’ve got our heads around the general concept, we’ll get into the details and learn about the hacks that will help us get the most out of this exercise and really benefit the rest of our guitar playing.
We want to start with one finger in each of the first four frets. First finger in the first fret, second finger in the second fret, and so on. Try putting your fingers in this position on the low E string. Our thumb should be positioned behind the middle finger, halfway down the neck. We want to keep our thumb in the exact same spot as we play this exercise. Later on, we’ll discuss why this is important and why the position of the thumb is what trips students up most of the time.
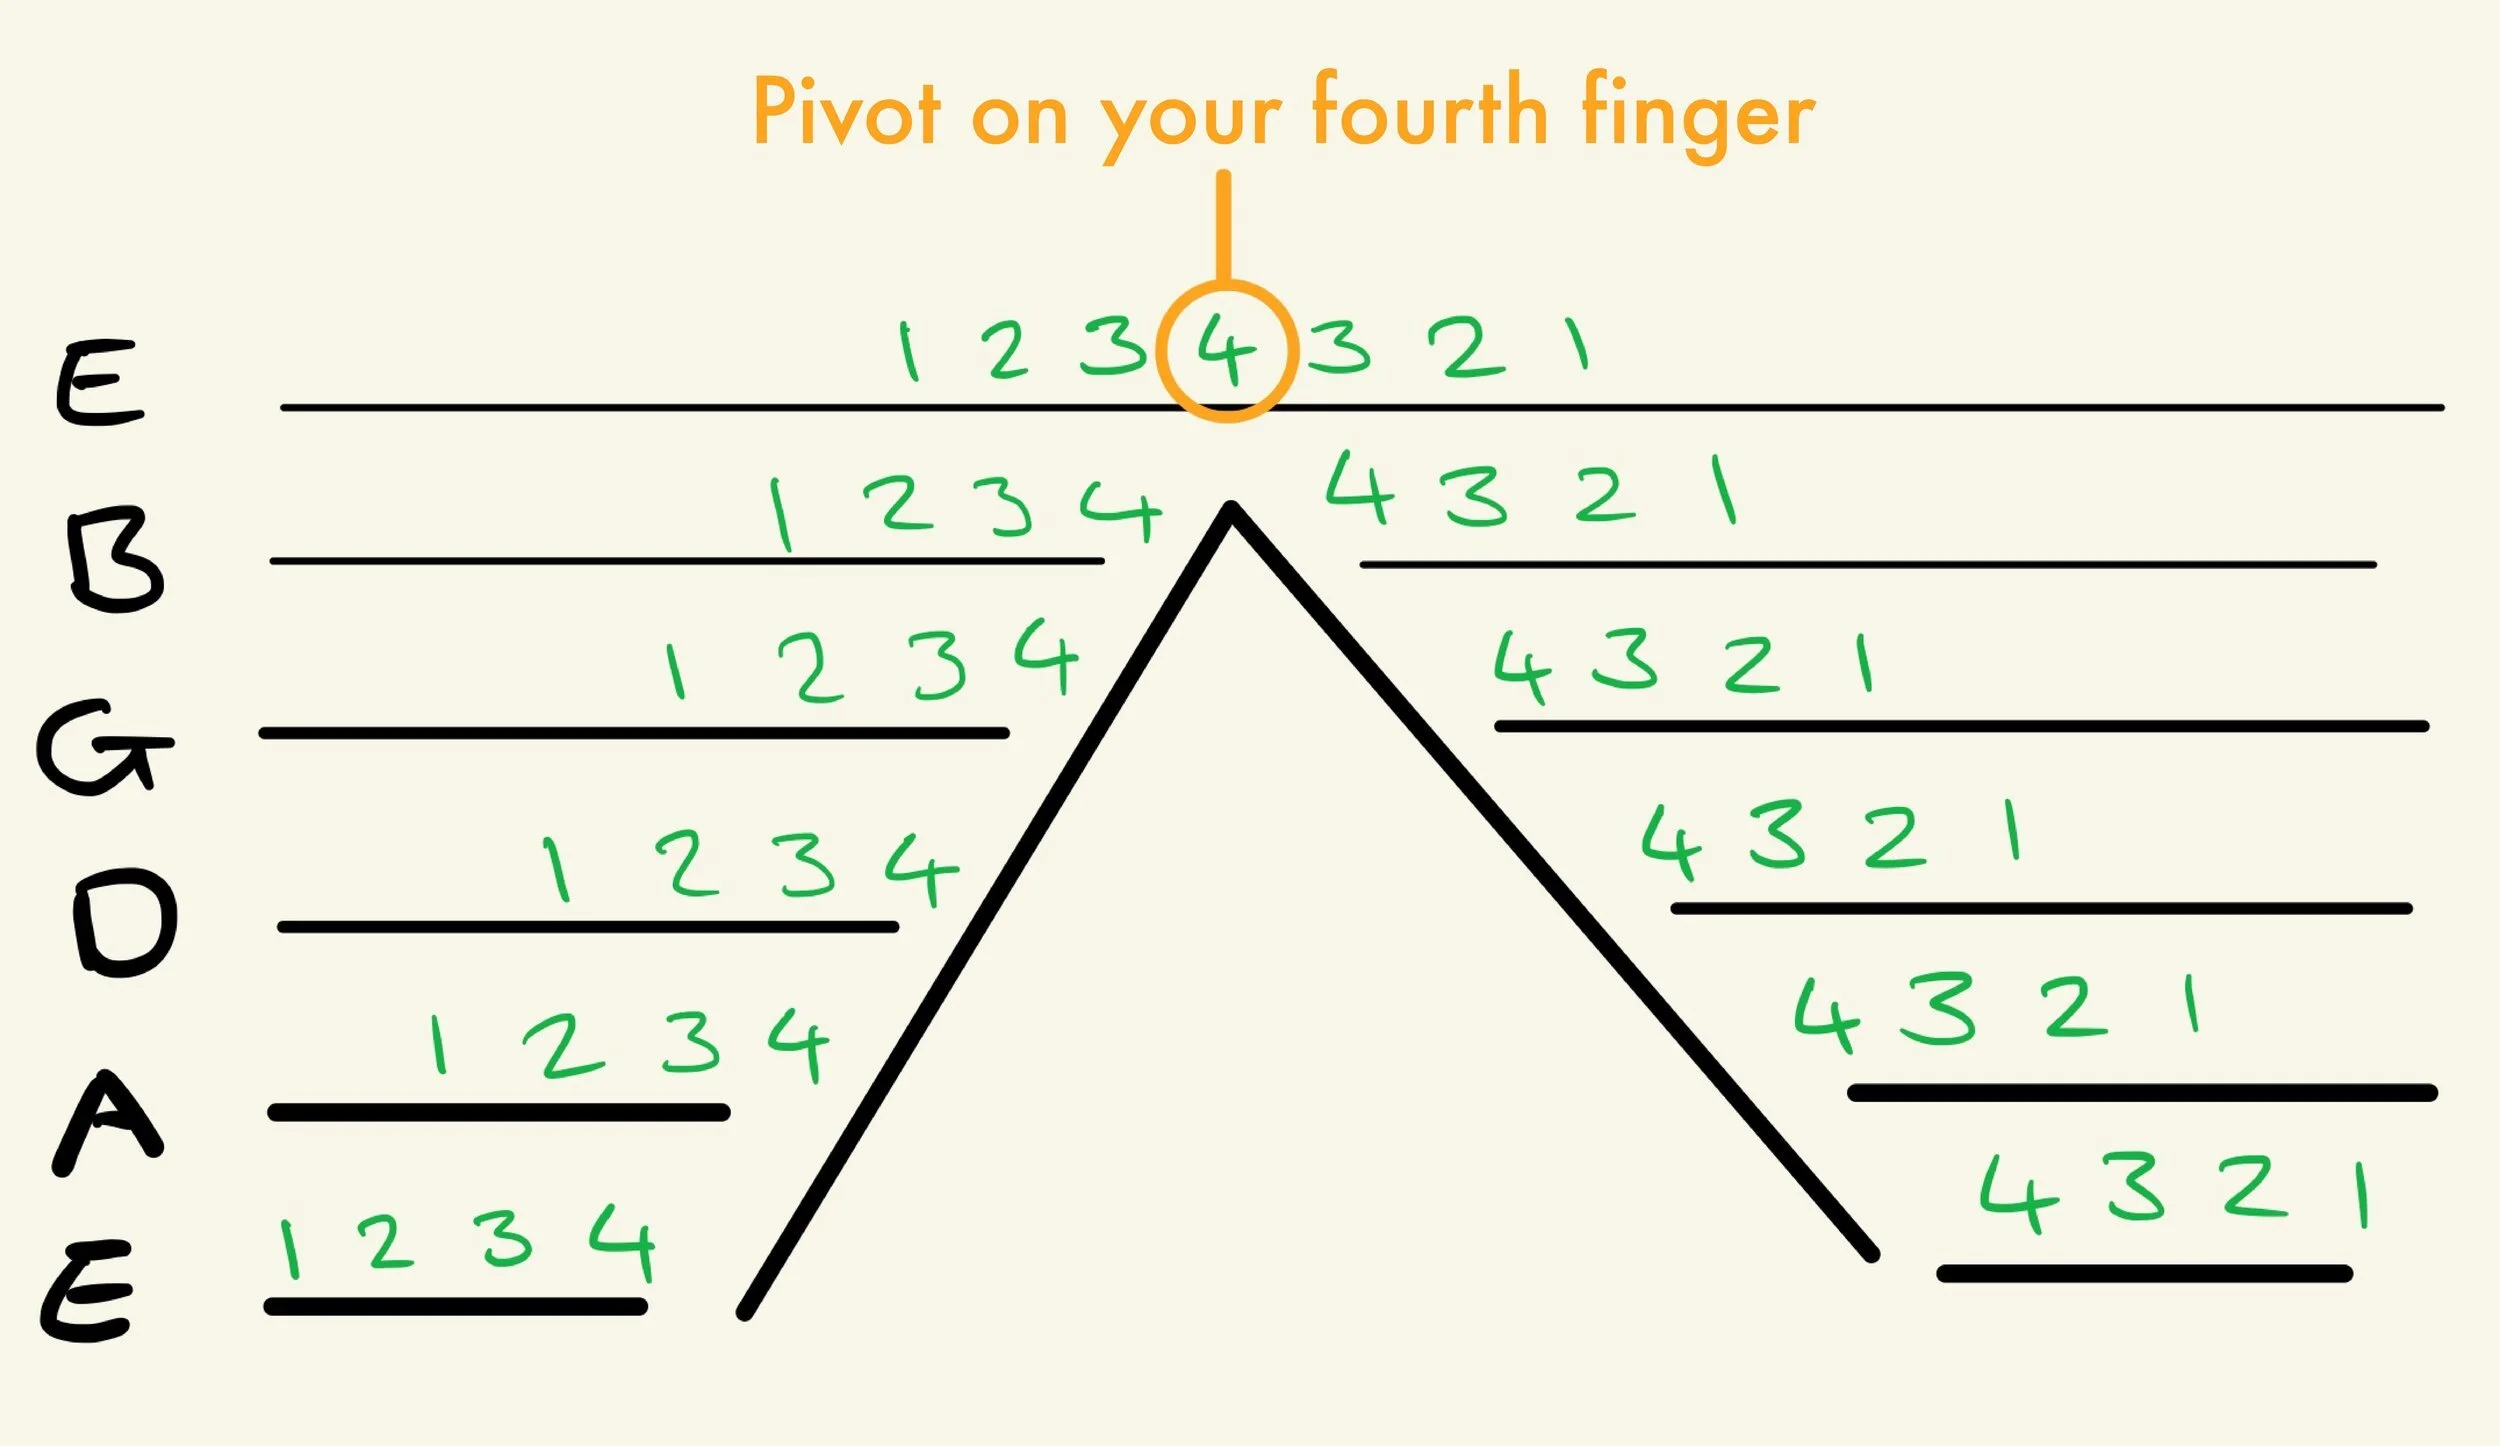
Once we have our hand in this position we are going to play each fret on the low E string one note at a time, starting with the first finger in the first fret, then the second finger in the second fret, then the third, then the fourth. Once we’ve played each of the four frets on the low E string with their respective finger, we’re going to reach down with our first finger to the first fret of the A string and work our way up that string. First finger in the first of the A string, second finger in the second fret. Third finger. Fourth. Keep this pattern going for the remainder of the strings. Once we get to the top (which you probably think is the bottom; think the highest pitch is the top, lowest pitch is the bottom) we’re going to turn around and do the whole thing in reverse. This time going four, three, two, one on the high E string. Then reaching up to the B string with our fourth finger and doing it again. Four, three, two, one.
When you reach the top note on the high E string, we want to pivot on the highest note (played by our fourth finger) rather than playing it twice. It’s useful being able to do it both ways, however, I find this way more similar to ‘real-life’ situations you’ll find yourself in when you’re improvising or playing rocking guitar solos.
How to make your practice more effective
Now that we know how to play the Caterpillar exercise, let’s talk about the key things we need to be aware of to supercharge our practice and have the biggest impact on our playing:
Hand position
The position of our hand is crucial when playing this exercise. Doing it wrong will make us frustrated and limit our potential on the guitar. Getting it right will maximise the quality of our practice and make us better players across everything we’ll do on the fretboard. Here are the key things to keep in mind:
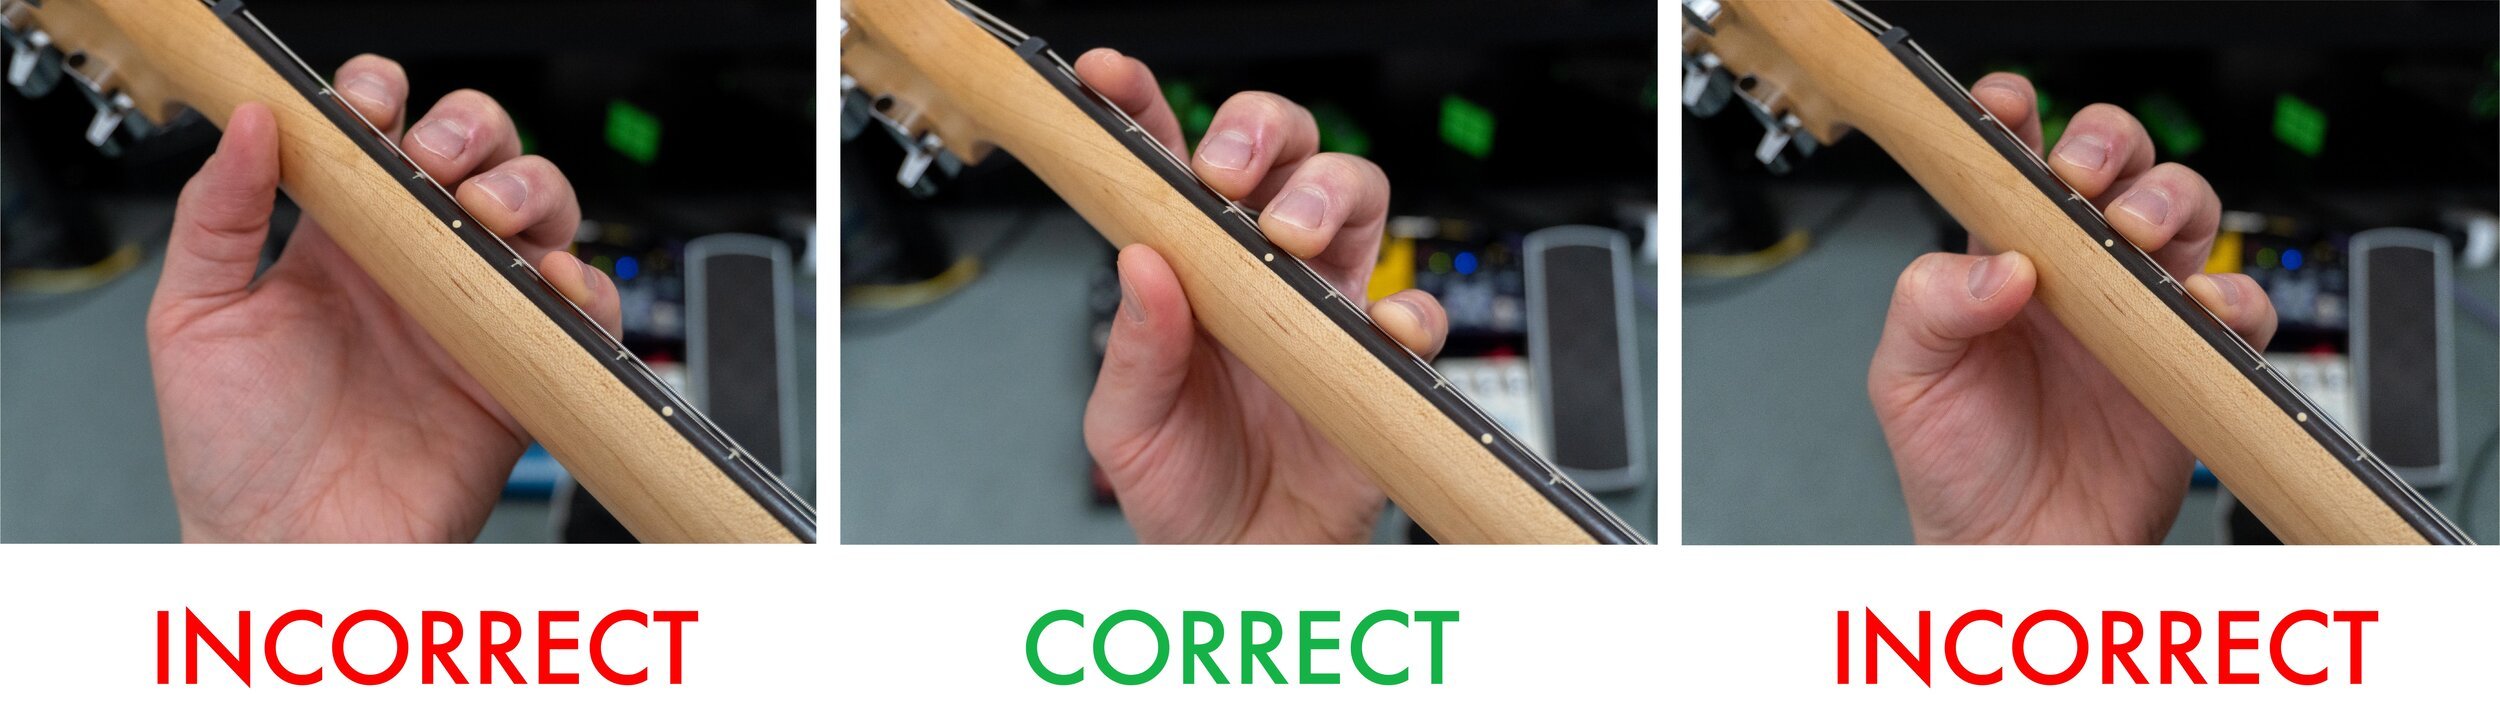
Keep your index and pinky finger both angeled inwards
Use one finger per fret
Keep your thumb behind your middle finger and halfway down the neck
Fingertips and fretting position
It’s important to make sure we’re using the tips of our fingers as we play this exercise. This is going to help us develop dexterity which will have a direct impact on our ability to play more complicated riffs later on.
We also want to make sure that we are playing every note with perfect fretting position; about three-quarters of the way up the fret, just behind the fret itself. As you’re playing the exercise, you might notice that it’s pretty much impossible to go from having a perfect fretting position with your second finger to perfect fretting position with your third finger. This is just due to how the hands are built. It’s really hard to separate your second and third finger so you have enough reach to move cleanly between frets. In this situation, it’s okay to have a little bit of a jump or slide to help facilitate a clean transition between the frets.
Your thumb is causing all your problems
Unfortunately for us, there are not a lot of things in life that require us to hold our thumb in the specific position we need it in to play the Caterpillar Exercise (and guitar in general). This means that right off that bat we’re at a disadvantage. Our hands have a lifetime of muscle memory, giving them context for how they are supposed to behave. They haven’t been in a situation requiring them to play the guitar before so they are just doing their best based on what they know. That’s why it’s important for our brain to step in as the personal trainer and supervise them as they learn how they are supposed to behave while they are playing the exercise. Once they’ve learned how to do it with good form, they can be left with their own devices. But until that point, it’s essential that we pay meticulous attention to what they are doing.
We’ve already mentioned that we want to keep our thumb behind the middle finger and halfway down the neck the whole time we are doing the Caterpillar Exercise. However, it’s also important that we consider how we are holding our thumb. We want to be using the flat part of our thumb, which will transfer the force through to the stronger muscle at the base of our palm. If we use the side or the tip of our thumb against the back of the neck then all the force stops at the joint in our thumb. This limits the amount of control we have and also negatively affects almost every other aspect of how we hold our hand.
Most students starting out have an issue or two holding their thumb correctly, and that’s normal. As I said before, there are basically no other activities in life that require us to hold our hand in the position we need when we play the guitar. Most issues students have simply stemmed from the fact that they haven’t yet developed the strength or dexterity they need in these muscles.
Remember, your brain is the personal trainer for your fingers. In the same way that your personal trainer at the gym monitors your movements until you develop the strength and dexterity to do them on your own, your brain needs to monitor the movements of your hands until you develop the strength and dexterity for them to execute the movements consistently and commit them to muscle memory.
It takes time to condition your body for a certain sport. The training that you will do to play tennis is very different from the training that you will do if you want to be a powerlifter. We trained our hands for certain tasks that we have to perform as we go through life. Now that we are playing the guitar, we have to make sure that the muscles we’ve been using for other things are conditioned to perform this new activity well.
As I mentioned earlier, every other issue you have with how you hold your hand when playing the guitar will be a result of not holding your thumb properly.
How to hold your palm properly
We need to have our palm flat when we are performing this exercise. A lot of students fall into the habit of doing the Caterpillar Exercise with their palm on an angle. However, having a flat palm is really important because it allows us to have a rounded pinky finger.
Have you ever tried holding up something heavy at arm’s length? Perhaps you skipped the gym and thought you’d try a few reps with the groceries. Regardless of whether you’re bodybuilding in your spare time, I’m sure everyone would agree that it’s easier if we curl our arm and hold the heavy bag of pizza, burgers, cake, and ice cream close. The guitar strings have tension on them. It’s like we are lifting weights. It may as well be the same situation for our fingers as holding a bag of groceries filled with the four main food groups at arm’s length. It’s hard, our muscles get tired, and we have far less control. This is what happens if we don’t have a rounded pinky finger. The joint is really far away it’s really hard to apply force. Keeping our palm flat creates a rounded pinky finger and brings the tip of the pinky closer to the knuckle. This makes it far easier to hold the string with good pressure and significantly improves our dexterity.
In addition to keeping palm flat, we also want to think about the idea of bringing the knuckles at the base of our fingers forward. Just in front of or in line with the fretboard. This helps us better use the tips of our fingers and improves our reach. As we come down from the low E string to the high E string, we want to make sure we end up with a straight line between the second knuckles from the base of our fingers and our elbow. This is important so we don’t develop RSI type symptoms by constricting the nerves in our wrist. While it’s unlikely that you are going to cause damage though incorrect hand position when you are starting out, make sure you consult a physio if you are getting a sore wrist. You will feel some muscle fatigue as a result of all these new hand exercises you’re doing, so don’t worry about that. After all, if you don’t feel your muscles after going to the gym, you probably aren’t lifting heavy enough weights!
How to practice effectively
One of the most important concepts when it comes to practice is the idea of mental bandwidth. This is the idea that we only have so much attention that we are able to allocate as we are practising. If we shift all our focus to one aspect of our playing, we might miss something happening elsewhere. As we increase the number of things we have to be aware of, we diminish the amount of focus we have available for each. And, as we raise the stakes by speeding up our playing, we reduce the amount of focus we have available overall.
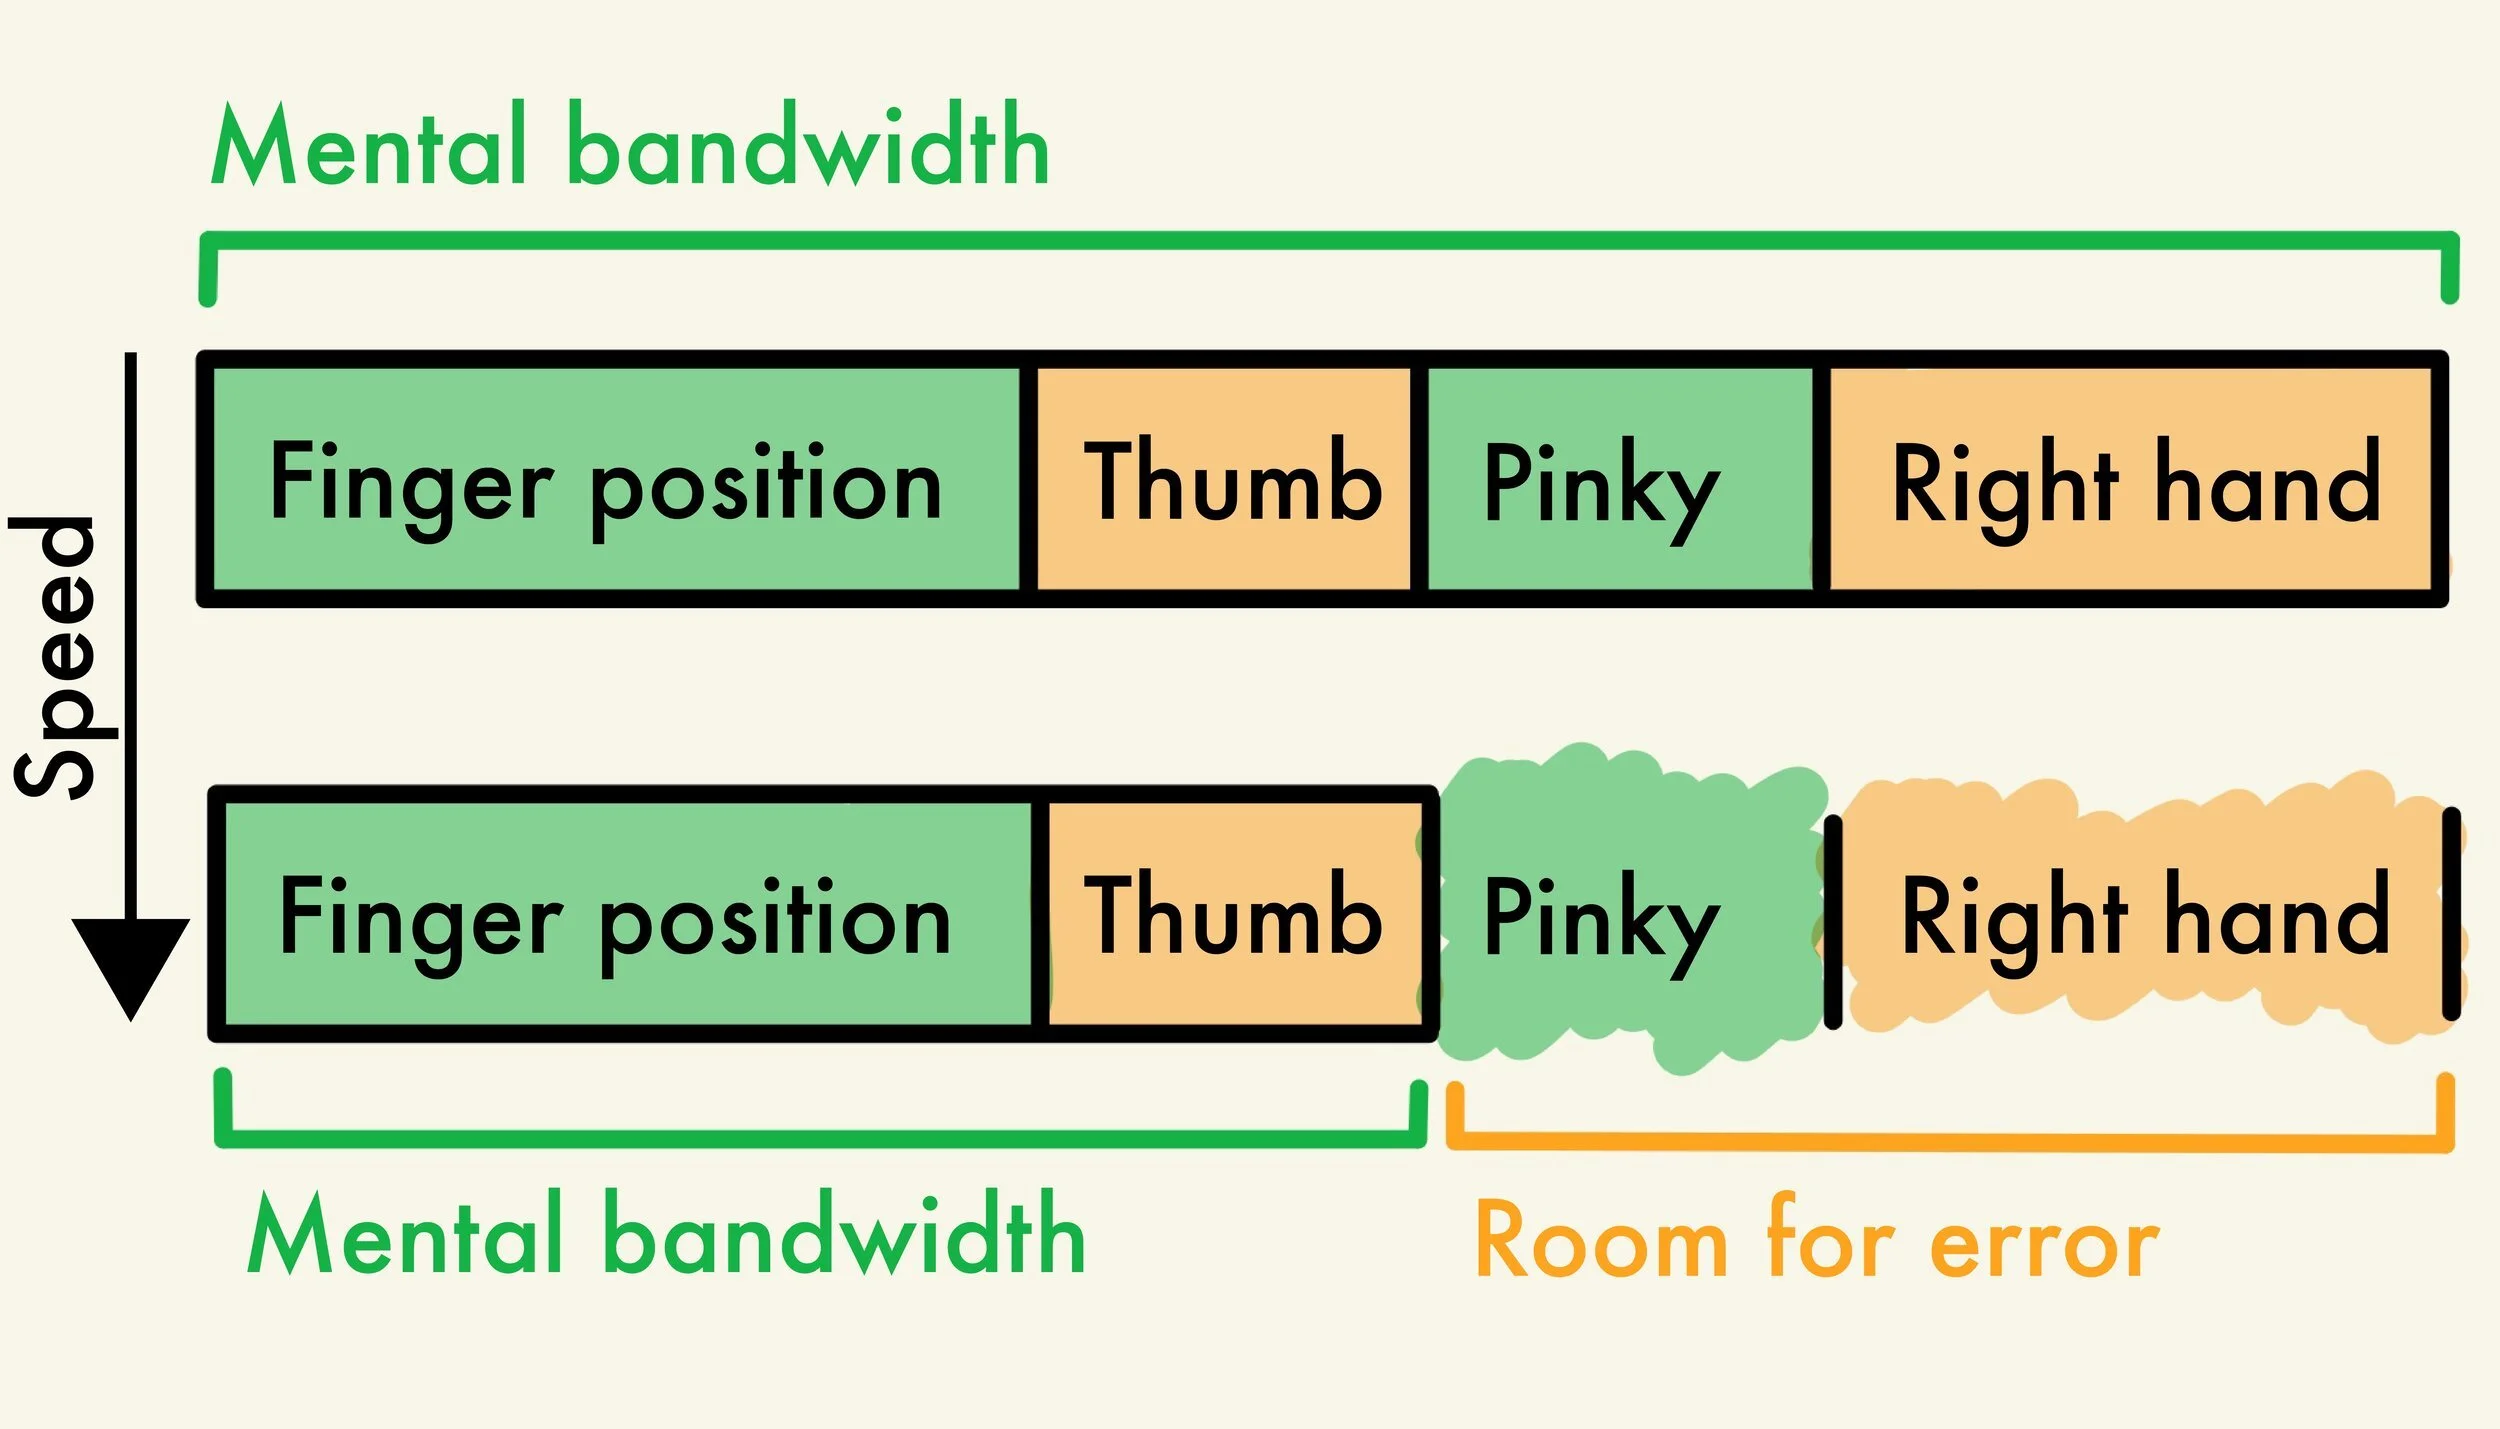
All of the things we’ve talked about already in this lesson vie for our attention as we are practising the caterpillar exercise. We have a lot to think about; our finger position, where we are holding our thumb and how that affects where our palm sits, how close our knuckles are to the fretboard and whether our pinky finger is straight. That’s just the left hand! We also need to be able to shift our attention over and observe what our right hand is doing. Alternate picking, how we’re holding the pick, small picking movements. With so much going on, it’s important that we practice the Caterpillar Exercise slowly so we have enough mental bandwidth to monitor and supervise our technique.
70 bpm (beats per minute) is a good place to start. I find anything slower than 70 bpm can be a little too slow to keep track of the click. At a certain point, playing things slower actually becomes harder. Once you get good at doing the Caterpillar Exercise at 70 bpm, one note per beat, you can begin to increase the tempo until you can do it at 140 bpm. After you’ve reached this benchmark, drop the speed of the metronome back down to 70 bpm and start practising the exercise at 70 bpm, two notes per beat. As you get more confident with the exercise you can increase your speed again, then drop it back to 70 bpm and try three notes per beat, then four notes per beat. Our goal is to be able to play the Caterpillar Exercise at 120 bpm, four notes per beat. This is the benchmark for anyone who considers themselves a competent guitarist.
As you increase the number of notes per beat on your journey towards four notes per beat at 120 bpm, don’t stop doing the exercise with fewer notes per beat. People often don’t practice in threes and this is an important feel. The ability to also move seamlessly between two, three, and four notes per beat is also an important skill. Once you’re at 120 bpm, four notes per beat, one note per beat at this tempo seems slow. However, you have so much more mental bandwidth at this speed now. One note per beat at 120 bpm is your opportunity to really focus in an observe your technique and prevent yourself from developing back habits. The care you take with these slow passes through the exercise will carry over into good technique when you’re shredding at 120 bpm.
Practicing with a metronome is important. However, if you’re at the stage where you can’t keep up with it at 70 bpm and there’s just too much going on, turn it off. There’s no rule that says you have to practice with a click. If turning it off is going to increase your mental bandwidth so you have a greater capacity to focus on developing good technique, lock that click in a drawer. Don’t leave it there for too long, though. If you’re practicing this exercise correctly, it shouldn’t be long before you need to pull it right back out.
Remember, the Caterpillar Exercise is here to serve you and make you a better guitar player. There is no shame in having to simplify it and don’t feel pressure to increase your speed. Tidy technique is always more impressive than sloppy shredding.
A guitarist who has learned all the notes on the fretboard: Can more effectively learn scales and chords; Has a better understanding of keys, intervals, and scale degrees; Is able to more easily memorise songs; Has a greater capacity to understand music theory; Is more effectively able to develop their aural skills; Gets ‘lost’ far less frequently when they are improvising on the guitar.